Cinnamon Rolls | In Cold Blood

The travellers stopped for dinner at a restaurant in Great Bend. Perry, down to his last fifteen dollars, was ready to settle for root beer and a sandwich, but Dick said no, they needed a solid 'tuck-in', and never mind the cost, the tab was his. They ordered two steaks medium rare, baked potatoes, French fries, fried onions, succotash, side dishes of macaroni and hominy, salad with Thousand Island dressing, cinnamon rolls, apple pie and ice-cream, and coffee.
In Cold Blood
Truman Capote
In Cold Blood is renowned for being possibly the best crime novel ever written, and there’s a reason behind that. It is such a compelling read and demands your attention after every page. I read this book probably almost a year ago and was reminded of it when I noticed it balancing precariously at the top of a book pile at a local opshop.
There are a number of interesting meals within its pages, notably the last meal that Richard and Perry choose. I think though, I was interested in the idea of what they would have eaten on their journey - and the almost calculated and calmness that comes with a meal like that. Instead of making their entire dinner I chose to just make the cinnamon rolls. Partly because I have just, so much bread flour to use up. And also because cinnamon rolls are delicious and I generally can eat around 5 in one sitting.
The road trip journey is something that I did recently (not with murderous intentions), taking a long weekend to go and stay at a tiny air bnb that had been built on the bush property I grew up on in rural Victoria. We had no wifi or phone reception for our time there and spent all of it reading books, drinking wine, and watching seasons of Xena.
Cinnamon Rolls
Makes approx. 9 rolls
Ingredients
2 tsp instant yeast
2 tbsp caster sugar
275ml water, lukewarm
100ml milk, lukewarm
525g bread flour + 2 tbsp for dusting later
2 tsp salt
60g butter
Filling
60g butter, softened
2 tbsp brown sugar
2 tsp ground cinnamon
Glaze
2-3 tbsp milk
400gm icing sugar
1 tsp vanilla extract
Combine the lukewarm water, milk, yeast, and sugar together in a bowl. Leave to sit for 5 minutes or until the yeast becomes frothy.
In another bowl mix together the flour and salt, pour in the frothy yeast mixture and combine until a rough dough comes together. Turn the dough out onto a lightly floured surface and begin kneading. As you do so begin kneading the 60g of butter into the dough.
Continue kneading for about 10 minutes or until the dough has become soft and elastic like. Place the prepared dough into a lightly greased bowl, cover with a damp tea towel and place into a warm place for around an hour or until the dough has doubled in size.
While the dough is rising is a perfect time to make your filling. Combine the softened butter, brown sugar, and ground cinnamon together and mix. Put to the side.
Remove the doubled dough from the bowl onto a lightly floured surface and gently roll the dough out until it is a few cm’s thick, and in a rough rectangular shape. Spread the butter / cinnamon filling onto the rolled out dough, evenly spreading it across.
From the longest side of the rectangle begin to tightly roll the dough up into a spiral. Once it is all rolled up use a sharp knife to evenly cut rolls that are 1 1/2” thick. You should get about 9 rolls from it in total. Line a baking tray with baking paper and place the prepared rolls on it, with the spiral facing outwards. Cover with a damp paper towel and leave for another hour to rise again.
While the cinnamon rolls are doing their second rise, preheat the oven to 180C. When the rolls have risen again, place them into the oven to bake. They should take around 15 - 20 minutes, depending how gooey you like your cinnamon rolls.
Leave them to cool, and make your glaze while they do. Combine the milk, icing sugar and vanilla and mix until it reaches the consistency you prefer. Drizzle over the cinnamon rolls and enjoy!
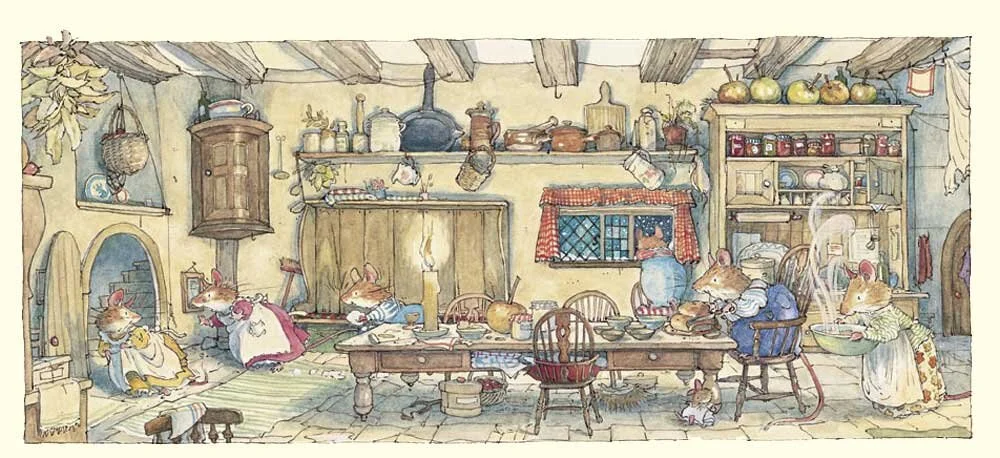
Lavender Scones with Whipped Honey and Seal Salt Butter | Brambly Hedge, The High Hills

The mice ate their picnic and enjoyed the late autumn sunshine but soon it was time to go on.
Brambly Hedge | The High Hills
Jill Barklem
I like to think that these lavender scones and butter would be the perfect thing to take along on a tiny mice picnic, to eat in the sun with a cup of tea poured from a tiny thermos.
I instead ate them on a weekend while drinking endless cups of tea! Of course. A close friend of mine sent me a package of amazing goodies recently, including some dried lavender from his and his partner’s garden. This is the first thing I’ve made with it but I’m so very keen to do syrup for iced lattes and many other things!

Lavender Scones with Whipped Honey and Sea Salt Butter
Makes approx. 9 scones
Ingredients
Scones
1/2 tbsp dried lavender
1/2 cup raw caster sugar
375g plain flour
1.5 tbsp baking powder
1 tsp bi-carb soda
115g butter, cold
230ml milk + 1 tbsp apple cider vinegar
Sea salt
Butter
2 tbsp honey
100g butter
Sea Salt
Scones
Preheat the oven to 200C and line a large baking sheet with baking paper.
Combine the milk and apple cider vinegar and set to the side to curdle into butter milk.
Using a grinder combine the sugar and lavender and grind until even and fragrant - I used a small blender to do this but have also used a mortar and pestle before, it just took a bit longer.
In a medium sized bowl tip in the lavender sugar, flour, bi-carb soda, baking powder, and a pinch of salt - mix until combined. Add int he cold butter and use your fingers to rub it into the flour until it resembles wet sand.
Make a well in the middle and pour in the butter milk, stirring with a wooden spoon until it is just combined.
Tip the dough onto a lightly floured surface, it will be quite soft, use your hands to gather it up and give it a few folds until you can bring it together to form a 1 inch thick mound. Use a round cutter, or a glass if needed, to stamp out as many scones as you can. Re-roll the scraps and repeat!
Place the scones onto the prepared baking tray in rows, letting them almost touch (this will encourage them to ride upwards instead of outwards!). I brushed the tops of mine with a bit of extra milk.
Bake for 15 - 18 minutes or until they are a light golden brown. Remove from the oven and let cool a little before serving with the honey and salt butter.
Whipped Honey and Sea Salt Butter
In the bowl of a stand mixer (if you have one! Otherwise you can also do this with a whisk, it just takes a bit more elbow grease) place your butter and beat until it is smooth and fluffy.
Slowly drizzle in the honey while beating it and 1 - 2 tsp of sea salt, depending how salty you like it!
Scrape the butter into a container and refrigerate before serving with scones. enjoy!
Beignets | The Princess and the Frog

Oh, Tia, you are bonafide genius. I’m gonna need about five hundred of your man-catching beignets!
Charlotte, The Princess and the Frog
I love beignets so much. My first memory of them is from my childhood, I would have been only 9 years old and my dad had spent a month in the US, travelling around the New Orleans and Memphis area. He spoke so highly (as a very health conscious individual, him exuding the delights of the beignet was very impressive) of the beignets from Cafe Du Monde, and had even bought one of their packaged mixes to bring home to Australia.
Before the moment I bit into that pillowy, warm, fluffy, icing sugar coated delight my only exposure to doughnuts were the dense, oily and vivid strawberry sprinkle covered monstrosities that were available at the school canteen. That first beignet was a revelation to my young mind that something so simple could be so, so delicious.
Obviously when The Princess and the Frog was released in 2009 and set within New Orleans, they of course had to feature the beignet as a speciality of Tiana. A friend had requested a veganised version of beignets a few years back and during a particularly long weekend I decided to try my hand at them. They turned out just how I remembered, and I think I inhaled nearly the entire batch with coffee after coffee as they came out from the fryer.

Beignets
Makes 6-7 small tarts or 1 big tart
Ingredients
240ml milk
5 tbsp rice malt syrup
1.5 tbsp dry yeast
80ml vegetable oil
520g plain flour
120g icing sugar
230ml vegetable or canola oil, for frying
Sea salt
In a small saucepan combine the milk and rice malt syrup, mix and heat until just warm. Too warm and the yeast will die.
Combine the yeast and the milk mixture in a large bowl and leave to sit for approx. 5 mins or until the yeast becomes a little frothy on top.
Add in about half the flour, 80ml of vegetable oil and a pinch of salt. Add in the remaining flour and mix until the dough is very soft and sticky. Pour it out onto a lightly floured surface and knead, you can oil your hands a little if the dough is sticking. Knead for about 10 minutes, or until the dough is soft and stretchy.
Lightly oil a large bowl and place the kneaded dough into it, cover tightly with cling wrap or a damp towel and place in the fridge for at least 2 hours - preferably overnight though.
Heat the remaining oil in a thick bottomed skillet until it reaches 180C.
Remove the dough from the fridge and place it into a lightly floured surface. Roll the dough out into a rectangle that is approximately 1/4 inch thick. Cut out your beignets from this (I usually like mine sort of smaller so about 2.5 inch rectangle works for me).
As you’re cutting out the beignets you can start frying them. Only do a few at a time (depending on the size of your skillet), you don’t want to overcrowd them. As they start to turn a golden brown, make sure you’re flipping them so they’re getting evenly cooked. About 2 minutes each side is all that is needed!
As you pull the beignets from the oil, place them onto a plate lined with paper towel to get the excess oil from it, before tossing with the icing sugar to coat it well. Enjoy hot with a coffee!
Apple and Blackberry Pudding | A Winter Story, Brambly Hedge

'Is that you, dear?' called Mrs Apple as he let himself in through the front door. Delicious smells wafted down from the kitchen. Mrs Apple had spent the afternoon baking pies, cakes and puddings for the cold days to come.
Winter Story, Brambly Hedge
Jill Barklem
I’m writing this entry while firmly wrapped in a blanket with a hot water bottle tucked up under my feet. It’s officially winter here and my favourite time of the year. There’s nothing better to me than walking home from work, headphones on and hood up, as the rain drizzles around me. I adore being able to spend my days inside with endless pots of tea and soft music filling the air. Being able to keep the balcony doors open as the rain pours down just outside, and that utterly lovely smell of fresh, clean rain spreads through the air.
Anyway, I really enjoy winter.
The Brambly Hedge books are a memory from my childhood that I think will always have a space in my mind. Growing up in the middle of the Australian bush, I remember wishing desperately that I could build a tiny home in a tree stump and have my days spent baking pies and jams for the native mice. Much like the mice within Brambly Hedge, stocking up a tiny larder for the colder months, with a fire warming the rooms.
Alas, I moved to a city, to a tiny apartment. Instead I’m spending my winter days making stews, soups and puddings to combat the cold. The below apple and blackberry pudding is one such, it’s got enough fruit that it feels somewhat healthy (…sure), while also being delicious. The recipe comes from Julia Busuttil Nishimura’s cookbook, A Year of Simple Family Food. I’ve changed the recipe slightly to be plant-based.
Apple and Blackberry Pudding
Ingredients
3 Granny Smith apples, peeled and cored
300g blackberries, frozen or fresh
1 tsp vanilla paste
1 lemon, zested and juiced
100g raw caster sugar
100g butter
50ml milk
2 tsp No Egg, mixed with 4 tbsp water
150g plain flour
1 tsp baking powder
To Serve
1 tbsp melted butter
1 tbsp raw caster sugar
1 tsp ground cinnamon
Cream or ice cream
Preheat the oven to 190C, and grease a baking dish with butter.
Slice the cored and peeled apples thinly and place into a bowl along with the lemon juice and vanilla paste. Toss to combine, add in the blackberries and fill the prepared baking dish with the mixed fruit.
Cream the butter and sugar together in a bowl until pale and fluffy. Add in the no egg and water and mix together. Stir the milk in, and then add the lemon zest and flour, mixing until the batter is smooth.
Spread the batter over the fruit, smoothing it across. Bake for approx. 45 minutes or until the top is a golden brown.
5 minutes before the pudding is ready to come out, combine the cinnamon and raw caster sugar together. When the pudding is done and removed from the oven brush the top with the melted butter and sprinkle the cinnamon sugar over the top. Serve with cream or ice cream. Enjoy!
Four Kinds of Cookies | The Wonderful Wizard of Oz

The Monkeys had set them down near a farm house, and the four travellers walked up to it and knocked at the door. It was opened by the farmers' wife, and when Dorothy asked for something to eat the woman gave them all a good dinner, with three kinds of cake and four kinds of cookies, and a bowl of milk for Toto.
The Wonderful Wizard of Oz
L. Frank Baum
Melbourne lockdown v.4 (I think…) and apparently all I will do during this time is bake things. I’m not really the biggest sweet tooth around, give me some vegemite on toast over chocolate anyway, but everything I’ve made seems to have been whisked away anyhow.
For the principle of the matter, I would refer to these as biscuits usually - because that’s really what they are. But the pages of the book that this recipe hails from, The Wonderful Wizard of Oz, is an American tale and thus I have given in and shall refer to them as cookies.
The base recipe for the cookies is taken from the Smith and Deli-cious cookbook, I have made some changes to it, removed some parts that really added nothing to the recipe and changed a few little things. The real delicious part of the recipe comes from what you can add in, my variations of them kind of rotate around chocolate (because honestly, what else) but you can basically substitute the nuts and chocolate for other things if you want.

Cookies, four kinds
Ingredients
270g dark brown sugar
150g butter
1 tsp vanilla extract or paste
1 tbsp No Egg, mixed with 3 tbsp water *see note
250g plain flour
1 tsp baking powder
Pinch of salt
Add ins
Salted Chocolate Cookie
160g dark chocolate, chopped
2 tsp flaky sea salt
Peanut Butter and Chocolate
160g dark chocolate, chopped
3 tbsp crunchy peanut butter
White Chocolate and Macadamia
80g white chocolate, chopped
80g macadamias, chopped
Biscoff Double Chocolate
4 tbsp Biscoff spread
80g dark chocolate, chopped
80g white chocolate, chopped
Preheat oven to 180C.
Cream together the sugar and butter until it is fluffy and a little lighter in colour. Stir in the No Egg and water mixture, and then add in the flour, baking powder and salt. Mix until the dry ingredients are completely combined in.
Now is when you can add whatever add-ins you like to it as well! Which chocolates or anything you want, add it in now. If you’re doing the peanut or Biscoff variation, save a little of the spreads to the side.
Roll the mixture into even sized balls and place onto a baking tray lined with baking paper. Make sure they’re distanced enough to allow for the spread when baking.
If making the Biscoff or peanut butter ones, bake for 7 minutes and then spoon the remaining spread lightly on top of each before returning them to the oven for a further 8 minutes. The spread will melt in and be delicious on top.
For the others, bake for around 15 minutes, for the chocolate ones sprinkle a little flaky sea salt on top once they come out.
Leave to cool on the tray until they harden and enjoy!
Lamingtons | Behind the Scenes at the Museum

As well as the scones, she has also produced plates of ham sandwiches (ham courtesy of Walter, the philandering butcher), 'Coconut Madeleines', 'Lamingtons', and 'Little Caramel Pastries' (Very Special!), not to mention 'Piccaninnies' (from Australia) and 'Dago Cakes' - these last two presumably in honour of all our little Commonwealth friends.
Behind the Scenes at the Museum
Kate Atkinson
2021 has crept along at a pace so fast it’s been hard to even see glimpses of it go by. And by that I mean it’s Winter already in the frosty streets of Melbourne and suddenly I’ve realised it’s been two months since I’ve posted anything on here. My brain hasn’t been working of late, my carefully laid plans of recipes to try from stacks of new cookbooks and piles of books with hastily underlined mentions of food through their pages have basically disappeared the moment I’ve had any time. Instead my weekends have been spent under a blanket on the couch, watching reruns of television shows I don’t even particularly enjoy.
But I guess that’s just how life goes.
Anyway - a small spark of motivation came through this weekend so I’ve taken full advantage and made a batch of the classic Australian treats, lamingtons. From the pages of Behind the Scenes at the Museum, which is really just the most amazing book. Atkinson’s incredible work has left me a little sleep deprived this week, as I found myself many nights realising it was 2am and I was fighting to keep my eyes open and get through another page. There are just so many foods referenced through this whole book, and making such a classic Australian food from a non-Australian book feels little sacrilegious. But, I couldn’t stop thinking of lamingtons once I saw them down on the page, and thus sometimes you just have to cave to your cravings.

Lamingtons
Ingredients
Cake
400g plain flour
250g raw caster sugar
2 tsp baking powder
1 tsp bi-carb soda
100ml vegetable oil
380ml milk
1 tbsp apple cider vinegar
1 tsp vanilla paste
Pinch sea salt
+ jam to fill
Icing
200g chocolate pieces
500g icing sugar
2 tbsp milk
15g butter
200g desiccated coconut
Preheat oven to 180C and grease and line with baking paper a square/rectangular baking pan.
Combine the milk and apple cider vinegar together, leave to the side to curdle.
Combine the flour, bi-carb, baking power, sugar, and salt together into a bowl and add in the oil and vanilla. While mixing steadily pour in the milk mixture and combine until the mixture is smooth and there are no lumps.
Pour your mixture into the prepared tin, making sure that it reaches all sides. Smooth it out on top if needed and bake for approx. 25 minutes or until a skewer inserted into the middle comes out clean.
Once the cake has baked leave to cool before using a serrated knife to carefully cut through the middle until you have two halves.
Seperate the two halves and spread a nice layer of jam across the middle, sandwiching the two cake halves together. I recommend popping this into the freezer for around 30 minutes or so, this will help stop the cake bits from sliding around when you coat with chocolate.
While the cake is in the freezer, you can make the icing. Bring a small pan of water to the boil, place a metal bowl on top of the pan (making sure the water does not touch the bottom of the bowl) and place into it your chocolate pieces and butter. Stir until the chocolate has melted.
In a largish bowl, combine the icing sugar and milk, using a whisk to bring them together.
Pour the melted chocolate and butter mixture into the icing sugar - it should be not too thick, you want to be able to easily dunk the cake bits into it. If it feels too thick add a little more milk in.
Remove the cakes from the freezer and using a sharp knife, slice them into squares (I got around 12 from mine! Don’t forget that once you add the chocolate and coconut on they’ll end up a lot bigger!).
Set up your coconut by pouring the desiccated coconut onto a large plate and make sure you have another plate nearby to put the finished lamington on.
Using two forks, gently dip the cake squares into the chocolate, making sure to coat all sides. Press each side into the coconut afterwards, adhering it to the chocolate and place this onto a plate in a fridge to set. Repeat with all the cakes.
Leave for about 30 minutes to set in the fridge before enjoying!