Lamingtons | Behind the Scenes at the Museum

As well as the scones, she has also produced plates of ham sandwiches (ham courtesy of Walter, the philandering butcher), 'Coconut Madeleines', 'Lamingtons', and 'Little Caramel Pastries' (Very Special!), not to mention 'Piccaninnies' (from Australia) and 'Dago Cakes' - these last two presumably in honour of all our little Commonwealth friends.
Behind the Scenes at the Museum
Kate Atkinson
2021 has crept along at a pace so fast it’s been hard to even see glimpses of it go by. And by that I mean it’s Winter already in the frosty streets of Melbourne and suddenly I’ve realised it’s been two months since I’ve posted anything on here. My brain hasn’t been working of late, my carefully laid plans of recipes to try from stacks of new cookbooks and piles of books with hastily underlined mentions of food through their pages have basically disappeared the moment I’ve had any time. Instead my weekends have been spent under a blanket on the couch, watching reruns of television shows I don’t even particularly enjoy.
But I guess that’s just how life goes.
Anyway - a small spark of motivation came through this weekend so I’ve taken full advantage and made a batch of the classic Australian treats, lamingtons. From the pages of Behind the Scenes at the Museum, which is really just the most amazing book. Atkinson’s incredible work has left me a little sleep deprived this week, as I found myself many nights realising it was 2am and I was fighting to keep my eyes open and get through another page. There are just so many foods referenced through this whole book, and making such a classic Australian food from a non-Australian book feels little sacrilegious. But, I couldn’t stop thinking of lamingtons once I saw them down on the page, and thus sometimes you just have to cave to your cravings.

Lamingtons
Ingredients
Cake
400g plain flour
250g raw caster sugar
2 tsp baking powder
1 tsp bi-carb soda
100ml vegetable oil
380ml milk
1 tbsp apple cider vinegar
1 tsp vanilla paste
Pinch sea salt
+ jam to fill
Icing
200g chocolate pieces
500g icing sugar
2 tbsp milk
15g butter
200g desiccated coconut
Preheat oven to 180C and grease and line with baking paper a square/rectangular baking pan.
Combine the milk and apple cider vinegar together, leave to the side to curdle.
Combine the flour, bi-carb, baking power, sugar, and salt together into a bowl and add in the oil and vanilla. While mixing steadily pour in the milk mixture and combine until the mixture is smooth and there are no lumps.
Pour your mixture into the prepared tin, making sure that it reaches all sides. Smooth it out on top if needed and bake for approx. 25 minutes or until a skewer inserted into the middle comes out clean.
Once the cake has baked leave to cool before using a serrated knife to carefully cut through the middle until you have two halves.
Seperate the two halves and spread a nice layer of jam across the middle, sandwiching the two cake halves together. I recommend popping this into the freezer for around 30 minutes or so, this will help stop the cake bits from sliding around when you coat with chocolate.
While the cake is in the freezer, you can make the icing. Bring a small pan of water to the boil, place a metal bowl on top of the pan (making sure the water does not touch the bottom of the bowl) and place into it your chocolate pieces and butter. Stir until the chocolate has melted.
In a largish bowl, combine the icing sugar and milk, using a whisk to bring them together.
Pour the melted chocolate and butter mixture into the icing sugar - it should be not too thick, you want to be able to easily dunk the cake bits into it. If it feels too thick add a little more milk in.
Remove the cakes from the freezer and using a sharp knife, slice them into squares (I got around 12 from mine! Don’t forget that once you add the chocolate and coconut on they’ll end up a lot bigger!).
Set up your coconut by pouring the desiccated coconut onto a large plate and make sure you have another plate nearby to put the finished lamington on.
Using two forks, gently dip the cake squares into the chocolate, making sure to coat all sides. Press each side into the coconut afterwards, adhering it to the chocolate and place this onto a plate in a fridge to set. Repeat with all the cakes.
Leave for about 30 minutes to set in the fridge before enjoying!
Chocolate Rum Balls | The Guernsey Literary and Potato Peel Pie Society
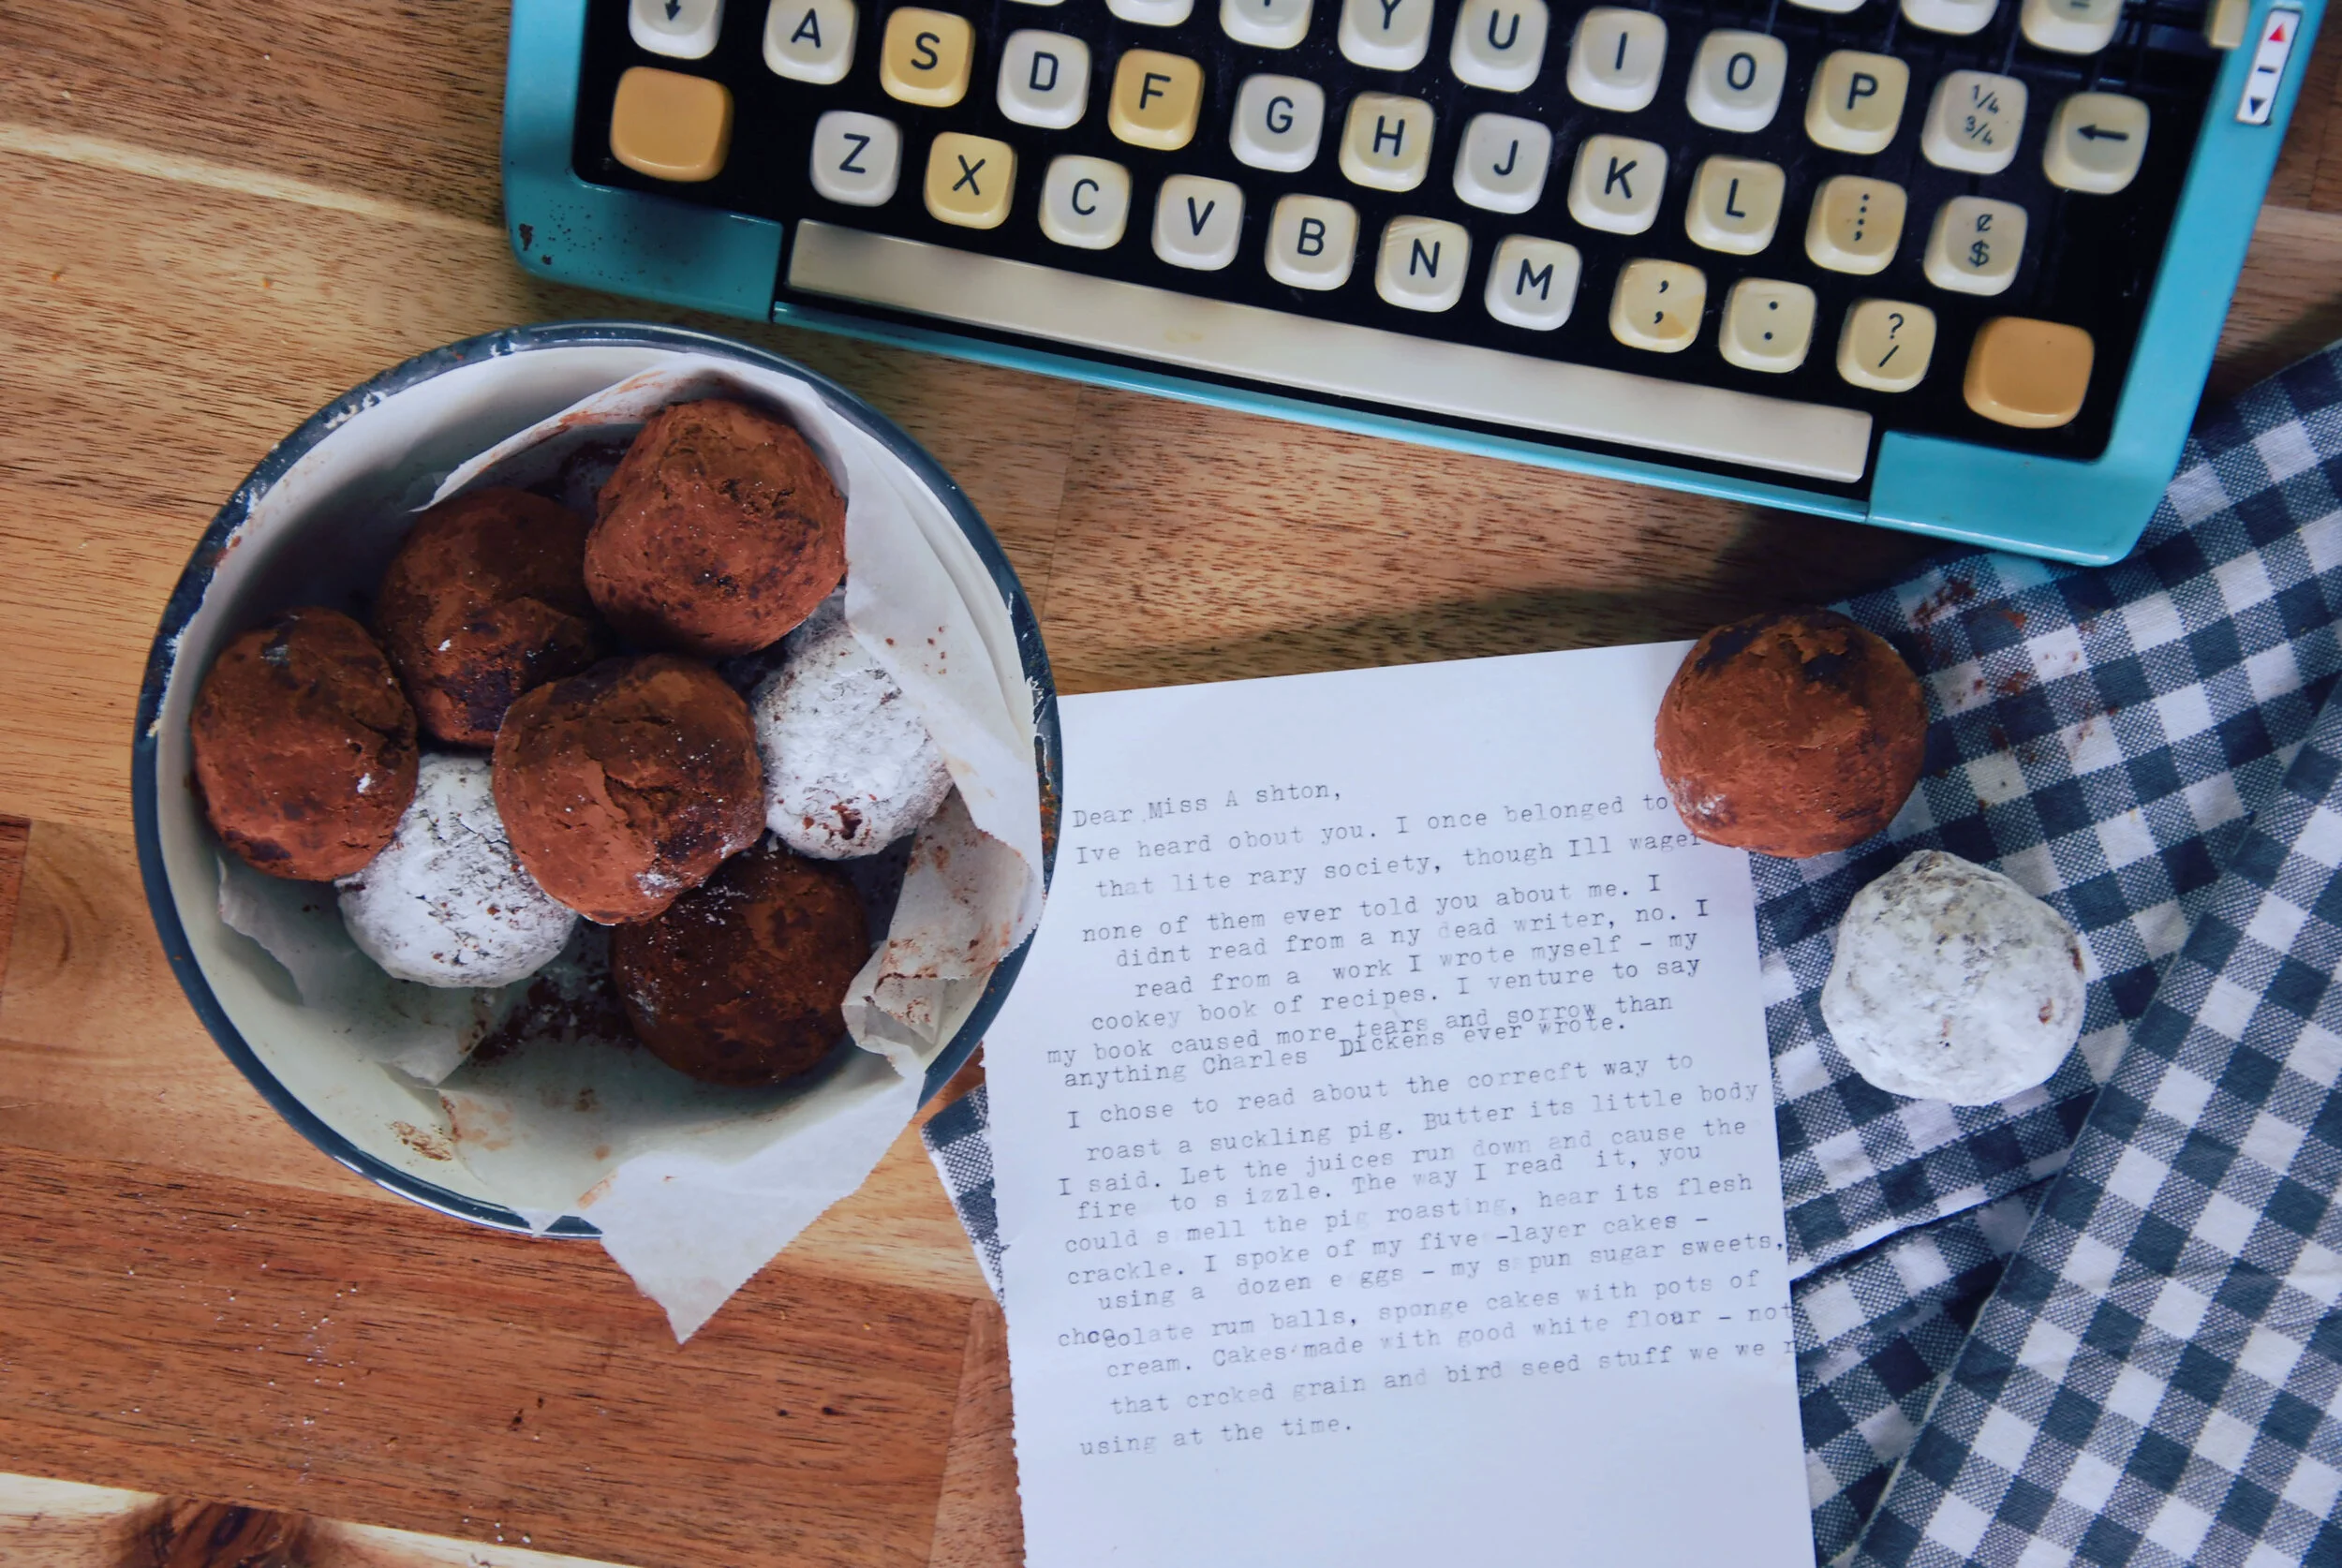
I spoke of my five-layer cakes - using a dozen eggs - my spun-sugar sweets, chocolate rum balls, sponge cakes with pots of cream. Cakes made with good white flour - not that cracked-grain and bird seed stuff we were using at the time.The Guernsey Literary and Potato Peel Pie Society, Mary Ann Shaffer, Annie Barrows
I spoke of my five-layer cakes - using a dozen eggs - my spun-sugar sweets, chocolate rum balls, sponge cakes with pots of cream. Cakes made with good white flour - not that cracked-grain and bird seed stuff we were using at the time.
The Guernsey Literary and Potato Peel Pie Society
Mary Ann Shaffer, Annie Barrows
I did the very much condemned notion of watching this movie before reading the book. The Guernsey Literary and Potato Peel Pie Society happened to come up on Netflix last year and catch my eye. It's an okay movie, but basically left me wanting to move to England and live in an island and be constantly grumpy while baking pies. Pretty much my life's goal.
I picked up the book not that long ago and sped through it on a work trip, managing to inhale the entirety of it within a single flight. It's quite simply written but delightful to read. While the notion of attempting a potato peel pie did cross my mind briefly, it soon disappeared when the description of the tantalising treats that Clara Suassey spoke of, which had her kicked out of the literary society, came to my attention on the page. Spun sugar, five-layer cakes and chocolate rum balls, an array of delicious sounding delights that immediately set my mind wandering. It settled quite firmly on chocolate rum balls - a treat that I remember as being very Australian, very much available around Christmas, and very much not containing rum. Though my memory of eating them is primarily based around the primary school years and may be a little skewed.
I wanted to step away from my childhood memory of rum balls and instead concentrate on ones that would have been most appreciated possibly on Guernsey as Clara Suassey read out loud her recipes. Ones without the outside coating of coconut, very much filled with a rich spiced rum and intensely chocolate-y.
*Note: I used coconut condensed milk and chocolate ripple biscuits for this recipe - both which happen to be plant based!
Chocolate Rum Balls
Makes approx. 12 - 16
Ingredients
1/4 cup of raisins, finely chopped
3 tbsp spiced rum
1 cup cocoa powder
2 cups desiccated coconut
250g chocolate biscuits, *see note
320g condensed milk, *see note
1/2 cup icing sugar
1 tsp vanilla extract
1/4 tsp sea salt
Combine the rum and the finely chopped raisins, set aside for around 10 - 20 minutes and let the rum soak into the raisins.
Meanwhile, using a food processor or blender, crush the chocolate biscuits until they're basically powder. A few chunks here and there are okay.
Place chocolate biscuit powder, 1/2 cup cocoa, desiccated coconut, condensed milk, rum soaked raisins, vanilla extract and sea salt in a bowl together and mix until well combined. The mixture should be firm enough to mould into a ball - if not, add a touch more cocoa.
Using the palm of your hand, roll spoonfuls of the rum ball mix into balls, placing them onto a a piece of baking paper on a tray. When all mixture has been rolled into balls place the tray into the fridge for a few hours or until mix has set.
Place the remaining cocoa and icing sugar into two seperate bowls, and roll the prepared balls into them to coat (separately that is, unless you want to combine the icing sugar and cocoa, all means go ahead). Enjoy with a good cup of tea!
Spice Cookies | We Have Always Lived in the Castle
"In the morning Constance decided to make spice cookies for dinner; that was too bad, because if any of us had known we could have told her not to bother, that Thursday was going to be the last day. Even Uncle Julian did not suspect, however; he felt a little strong on Thursday morning and late in the morning Constance brought him into the kitchen which smell richly of spice cookies and he continued putting his papers into the box."- We Have Always Lived in the Castle, Shirley Jackson
In the morning Constance decided to make spice cookies for dinner; that was too bad, because if any of us had known we could have told her not to bother, that Thursday was going to be the last day. Even Uncle Julian did not suspect, however; he felt a little strong on Thursday morning and late in the morning Constance brought him into the kitchen which smell richly of spice cookies and he continued putting his papers into the box.
We Have Always Lived in the Castle
Shirley Jackson
I’m a few days late with my latest recipe post but I wanted to try and stretch this one out for Halloween. Halloween isn’t something that has been been hugely celebrated within Australia, but I’ve noticed in the last few years that more and more children seem to be on the street trick or treating, and I really can’t argue against children being cute in costumes. We handed out an array of lollies and icy poles last night as they came knocking, the frozen treat greatly appreciated by many in the hot weather.
I picked up Shirley Jackson’s We Have Always Lived in the Castle at random a few weeks ago, having finished the book I had on me over lunch and wanting another for the train back home. I ended up loving it. A gothic mystery story, the entirety of the book was filled with an array of descriptive foods and thoughts - described in a way that utterly captivated me. It was hard to choose exactly what food I wanted to explore from it (I may try my hand at Constance’s special rum cakes in the future), but ended up deciding on Spice Cookies.
Also, before we get to the recipe part. Yes these are quite burnt. My oven as always, is terrible for baking and there is no way to regulate temperature basically. I did do a second batch the next day and realised that I just needed to be shifting them around inside the oven and covering them with foil for a little bit. No need to do that yourselves, unless you also have an oven from the 70's (that they don't make parts for anymore - it's been missing a handle for three years) that is utterly terrible for baking of any sort. I will likely remake them again another day and do some nicer photographs but eh, this is kinda what happens sometimes.
These cookies are amazing, a gingerbready delight of spices, the perfect snack to have with a tea or hot chocolate. I took numerous batches to work and they all disappeared quite quickly. I sourced the recipe from here, but ended up changing around a few measurements and ingredients to better suit what I wanted.
Spice Cookies
Makes approx. 16
Ingredients
2 1/4 cup plain
2 1/2 tsp baking powder
2 tsp ground cinnamon
1 tsp ground nutmeg
2 tsp ground ginger
1 tsp ground cardamon
1/4 tsp sea salt
115g butter, melted
2/3 cup brown sugar
1/2 cup molasses
1/2 tsp vanilla extract
3 tbsp raw sugar, for rolling the cookies in
Preheat oven to 180C and prepare two baking trays with a layer of baking paper.
Combine plain flour, baking powder, all spices and salt together in a bowl and combine well.
In a seperate bowl, combine the melted butter with the brown sugar, vanilla and molasses.
Combine the wet ingredients with the dry and mix until combined, it should form a soft dough - if it feels too wet, add a touch more flour.
Cover and refrigerate for approx. 30 minutes.
Roll the cookie dough into balls (size is up to you, but try not to make them too giant) that are all roughly the same size, press the tops down into the raw sugar and flatten slightly.
Place the cookies onto the prepared trays and bake for 10 - 12 minutes, or until the cookies have expanded and are cracking on top slightly.
Leave on the tray to cool for at least five minutes before placing onto a cooling rack. Enjoy!
Almond & Pear Cake | The Landlady
“‘Good gracious me,’ he said. ‘How absolutely fascinating.’ He turned away from the dog and stared with deep admiretion at the little woman beside him on the sofa. ‘It must be the most awfully difficult to do a thing like that.’‘Not in the least,’ she said. ‘I stuff all my little pets myself when they pass away. All you have another cup of tea?’‘No, thank you,’ Billy said. The tea tasted fairly of bitter almonds, and he didn’t much care for it.”- The Landlady, Roald Dahl
“‘Good gracious me,’ he said. ‘How absolutely fascinating.’ He turned away from the dog and stared with deep admiration at the little woman beside him on the sofa. ‘It must be the most awfully difficult to do a thing like that.’
‘Not in the least,’ she said. ‘I stuff all my little pets myself when they pass away. All you have another cup of tea?’
‘No, thank you,’ Billy said. The tea tasted faintly of bitter almonds, and he didn’t much care for it.”
The Landlady
Roald Dahl
The days are slowly warming, the scent of Australian pollen is beginning to fill the parks of Melbourne and the urge to run away to the countryside is coming in full. I would argue that there is no better place to experience Spring within Australia than Victoria - the brisk edge of chillness still lingers throughout but the days seem to stretch longer.
I took a trip to Daylesford to celebrate the warming weather, spending a weekend tucked away in a tiny studio airbnb, following random bush walks that seemed to stretch for hours, and lounging the afternoons away in a hot chocolate apothecary with numerous books. The town was delightfully quaint and brought about a few moments of reminiscing about my own childhood in a similar setting.

As most children, I adored Roald Dahl - I’ve gone on about my love for Matilda before (and assumption that I should probably have developed telekinetic powers since I also read a lot as a child). But, his short stories are oddly what remains firmly etched within my brain. I think I likely picked up a copy of his short stories from my parents bookshelf when I was around 14, expecting something similar to the children’s tales that I had devoured before, and was shocked to encounter stories of murder, horror and general…weirdness.
Picking up a book that contained the completed short stories of Roald Dahl was something special, and a recent reread has left me remembering the delights of his writing. Despite reading it previously, it seems that every short story’s end comes as a complete surprise, much like when I first read them.
While I promise this cake contains no secret ingredients that a particular character from one of his short stories is fond of - it is instead delicious. Moist, crumbly and perfect with a cup of tea and a good book on a spring afternoon.
Almond and Pear Cake
Makes one 8” cake
Ingredients
100g plain flour
125g butter
125g caster sugar
90ml milk
1 tbsp apple cider vinegar
100g almond meal
1 tsp baking powder
1/2 tsp bi-carb
3 pears, peeled, cored and cut in half and thinly sliced
50g flaked almonds
1/2 tsp cinnamon
Grease an 8” cake tin, lining the bottom with a circle of baking paper.
Combine the apple cider vinegar and milk - leave to sit for five minutes, or until it begins to curdle.
Combine butter and sugar in the bowl of a mixer, and cream together until pale and fluffy. Slowly add in the prepared milk mixture while beating.
Remove the sugar mix from the mixer and fold in the flour, bi-carb, baking powder, almond meal and cinnamon. Mix until combined.
Pour the cake mixture into your prepared tin and arrange the slices of pear on top neatly (or messily - it’s your cake).
Place into the oven and bake for 25 minutes before removing it to scatter the flaked almonds over the top. Return the cake to the oven and cook for another 10 - 15 minutes, or until a skewer inserted into the middle comes out clean. Though do be careful not to poke the skewer into one of the pear slices.
Leave to cool for at least 30 minutes before removing from tin. It is particularly good with a cup of tea and some coconut yoghurt. Enjoy!
Dumplings | The Kitchen God's Wife
“Back home, I told the cook girl to boil enough pots of water and to chop enough pork and vegetables to make a thousand dumplings, both steamed and boiled, with plenty of fresh ginger, good soy sauce, and sweet vinegar for dipping.”- The Kitchen God's Wife, Amy Tan
Back home, I told the cook girl to boil enough pots of water and to chop enough pork and vegetables to make a thousand dumplings, both steamed and boiled, with plenty of fresh ginger, good soy sauce, and sweet vinegar for dipping.
The Kitchen God's Wife
Amy Tan
I don’t think I’d ever really eaten a dumpling of any kind, before I moved to Melbourne. While there were a few Chinese restaurants in the country town I called home, my family never really frequented them. Instead most our eating out consisted of milkshakes and burgers at a local cafe, or fish and chips on a Friday night, called in ten minutes early to the fish and chip shop in the tiny neighbouring town that was closest to our house.
When I moved to Melbourne though I discovered the deliciousness that is a dumpling. While there may be many disagreements for where the best dumplings in the city are, my vote goes to Shanghai Dumpling House. Terrible service, tissues on tables instead of napkins and food that is usually thrown on the table without a word - however, there’s no better place to devour plate after plate of deliciously hot dumplings during the cold days, filling up on the decadent plates (15 dumplings for $7 is pretty great) and refilling cup after cup of the free tea.

I think I devoured most of Amy Tan’s novels in the same way - trying to hide away during winter and read as much as possible at once, frantically trying to finish so I could see how the story would end. It was once I’d finished, and looked back at the mentions of food throughout that I realised I’d never made dumplings. It was the following weekend that I also realised that my local asian grocer had an entire fridge utterly filled with different kinds of dumpling wrappers - if I believed in signs from the universe, this would have been a sign.
*Note: Depending where you go there may be lots of different types of dumplings wrappers available. Try and get the jiaozi ones - it’s what I used and they were perfect.
Dumplings
Makes approx. 3 - 4 dozen
Ingredients
Dumpling wrappers *see note (at least a pack of 50)
3 tbsp vegetable oil + 1/4 cup
2 tsp minced ginger
1 brown onion, very finely diced
1 carrot, finely grated
2 cups shiitake mushrooms, very finely diced
1/2 head white cabbage, very finely sliced
1 cup gallic chives, very finely sliced
2 tbsp soy sauce
1 tbsp sesame oil
1 tsp white sugar
Fresh pepper
1/2 cup of water
To serve (whatever you want really)
Soy sauce
Sweet vinegar
Chilli oil
In a large wok or frying pan heat 3 tbsp vegetables oil and add in the ginger and onions. Cook for a few minutes or until onion is translucent.
Add in the mushrooms, cooking for around 5 minutes until just tender. Add in the carrots and cabbage and continue to cook until all vegetables are tender - remove from heat and transfer to a bowl.
Add into the bowl the garlic chives, sesame oil, fresh pepper, soy sauce, sugar and remaining 1/4 cup oil. Stir until all the filling is nicely mixed (if the mixture is a bit too wet at this stage, I tend to pop mine in a fine meshed sieve and let a bit of it drip out so the dumplings aren’t too soggy).
Now for the fun part: assembling them. Dip your fingers into the water and dampen around the edge of the dumpling wrapper before spooning a small amount of the vegetable mix into the middle. Working from the edge, pinch together the sides of the wrapper using the water to press the edges together more when necessary. Place onto a lightly floured surface when done. Repeat with all remaining vegetable mix.
To steam the dumplings, you can either use a bamboo steamer or a regular vegetable steamer - just make sure you place a bit of cheesecloth inside the steamer first or otherwise the dumplings will stick badly to the pan.
To fry, heat a few tablespoons of vegetable oil in a frying pan, placing the dumplings into the pan when the oil is hot. Allow them to fry for about two minutes before adding a small layer of water to the pan, reducing the heat and covering so they can steam. Once the water has evaporated you can remove the cover and let them fry for another couple minutes.
Serve immediately with your choice of dipping sauce.
Katsudon | Kitchen
‘I peered through into the darkened windows of souvenir shops and I spotted the light coming from a small eatery that was still open. Through the frosted glass door I saw it had only one customer, who was sitting at the counter. I opened the door with a sense of relief and went in. I craved something heavy and filling, so I ordered deep-fried pork in broth over rice. "Katsudon, please," I said.’- Kitchen, Banana Yoshimoto
I peered through into the darkened windows of souvenir shops and I spotted the light coming from a small eatery that was still open. Through the frosted glass door I saw it had only one customer, who was sitting at the counter. I opened the door with a sense of relief and went in. I craved something heavy and filling, so I ordered deep-fried pork in broth over rice. ‘Katsudon, please,’ I said.
Kitchen
Banana Yoshimoto
An incredibly amount of influence into the books I read come from recommendations. Whether it be a book that a friend mentions casually, one that has a glowing review in a local paper or the multiple of recommendations that flood through the wonder that is instagram.
This month, I’ve been drawn quite heavily into Babbling Books' Women in Translation Month. When perusing both her and others suggestions for the month I came to the realisation that I already had a number of translated books in my shelf already - I just had no idea that they were. I picked a couple off the shelves and dedicated the week to a reread for inspiration of a dish to make and my attention rarely was drawn away from Kitchen by Banana Yoshimoto. There are so many mouth watering dishes that are described in detail throughout the story - much of what ties into the beautifully written tale. I think for the month of August, most of my literary inspired meals will be done within the realm of Babbling Books' Women in Translation challenge.

Katsudon was the main item that wouldn’t disappear from my mind, however. The above quote from the book just installs a sense of comfort and warmth with the dish - of a hearty and filling meal that is bound to bring a sense of satisfaction to anyone, eaten late at night in a tiny, empty store. When I first moved to Melbourne, I would eat the same dish, in a particular tiny storefront buried somewhere within China Town late at night after a long shift at the restaurant I worked at. After giving up meat I hadn’t thought of it in years until my reread of Kitchen when the urge to recreate the dish would not leave my mind.
It was everything I remembered about the dish from years ago, and myself and my housemate greedily devoured it while the rain poured outside and we clustered around the tiny heater in the lounge.
*Note: So, I used soy steaks that I sourced from a local Asian grocer. Pressed tofu would also work wonderfully for this I believe. Otherwise, it can be made with pork chops of course - I would recommend using a mallet or rolling pin to gently pound the meat thin if you do choose to use this.
Katsudon
Serves 2
Ingredients
2 x meat of choice *see note
1 cup panko breadcrumbs
1 tbsp corn flour
2 tbsp water
1 tbsp plain flour
1 small brown onion, finely sliced
1 cup sushi rice
2 cups chicken stock
1 tbsp soy sauce or tamari
3 tsp mirin
2 tsp white sugar
2 tbsp finely chopped nori
1 3/4 cup vegetable oil
1 tbsp olive oil
1 spring onion, finely sliced
Mix together the corn flour and water well, so no lumps are remaining. Set into a wide bowl, and do the same for the plain flour and panic breadcrumbs. You essentially want three seperate bowls for prepping the katsu.
Heat your oil in a shallow frying pan on a medium head until it reaches approx. 170C. You can test by dropping a few breadcrumbs in it - if they bubble and spin the oil is ready.
Dip each fillet (whatever you are using) into the flour first, followed by the corn flour mix and then the breadcrumbs, ensuring that it is well covered.
Drop each breadcrumb covered fillet into the oil, cooking each side for approx. 2 minutes or until a nice golden brown. Remove and sit on a piece of paper town to drain the excess oil.
Once they’re a little cooler, slice each piece into slices that are around 1 inch wide.
Now is a good time to get the rice ready. Since the sushi rice off to remove the excess starch and place into a saucepan with 1 1/2 cups of the chicken stock. Cook on a medium heat until ready and place to the side. It should be ready around the time as everything else to be brought together.
Time to prepare the sauce. Combine the remaining 1/4 cup of chicken stock, nori, sugar, mirin and soy sauce in a pan and cook until lightly simmering. It should thicken slightly.
Heat the olive oil in a large saucepan and cooked the finely sliced brown onion until soft.
Place the slices of katsu on top of the onion in the pan - drizzling the sauce over the top, cooking it all in the pan for around 2 minutes.
Split the rice between two bowls and carefully divide the katsu between the two, along with the remaining sauce and onions from the pan. Scatter with the sliced spring onion and enjoy!