Bath Buns | The Railway Children

Whenever an Editor was sensible there were buns for tea.
One day Peter was going down to the village to get buns to celebrate the sensibleness of the Editor of the Children's Globe, when he met the Station Master.
The Railway Children
E. Nesbit
Whenever I can't sleep I seem to retreat to the kitchen, making the ridiculous choice to bake something that requires almost 3 hours of proofing time before they can be even baked. While it felt ridiculous at one am, waking up to freshly made Bath buns made it all kinds of worthwhile. I've been rereading classic books from my childhood lately, taking the time in lockdown to dive into a river of nostalgia.
I had never heard of Bath buns before and it took an embarrassingly long time before I realised the name was a result from them originating in Bath, England - not that they were some kind of bun eaten in the bath. They are referenced just once within the pages of the Railway Children - as a treat a lady within the pages enjoys. It made sense that they would likely be similar to the buns Peter buys for the family's tea - the result of an Editor being sensible of course.
Since trying this delicious, brioch-y bun I'm full convinced it would be the perfect treat for a celebration at tea time. The flavour of the caraway seeds melds in so lovely with the richness of the dough. Like many classic recipes there are different variations of how these can be made - I chose to fill mine with currants and zest. Some recipes I took a lot at incorporated a sugar cube folded into the unbaked dough of each bun as well, something that I'm definitely interested to try next time.
Bath Buns
Makes 12 buns
Ingredients
2 tsp instant yeast
250ml milk + 2 tbsp for glazing
3/4 cup currants
450g bread flour
225g butter
1 tbsp caraway seeds
30g caster sugar
1 tsp sea salt
Zest of one lemon
Topping
2 tbsp caster sugar
2 tbsp water
1 tbsp caraway seeds
4 - 5 white sugar cubes, roughly crushed
Heat the milk until just warm, add in yeast and sugar and leave to sit for a few minutes until it becomes frothy.
Combine the flour, caraway seeds and salt in a bowl and work the butter in with your fingers tips until it resembles wet sand.
Add in the yeasty milk and mix well until all combined. Leave to rest for about 10 minutes.
Tip the dough out onto a lightly floured surface and knead for about 10 minutes, or until the soft has become soft and elastic-like. Lightly oil a bowl, place the dough inside and cover with a damp tea towel. Leave in a warm place for 1 - 2 hours or until doubled in size.
Once the dough has doubled in size, turn it back out onto a surface and and press the currants and zest into it - you may need to lightly knead it again to work them in.
Divide the dough into 12 pieces that are around the same size. Shape into a ball by using your fingers to form a cage against the table, rolling the dough beneath it. Repeat will all the dough, placing the prepared buns onto a baking paper lined tray - leave a decent amount of space between them as they will expand and rise.
Cover the prepared buns with a damp tea towel and leave for another 30 minutes to rise again.
Pre-heat your oven to 180C when you have about 20 minutes of rising time left. During this time prepare the sugar glaze for the top as well. Combine the sugar and water in a saucepan and cook on a low heat - the sugar should dissolve after a few minutes. The longer you leave it to cook the stickier it will become, so you can really do this part however you like.
Once the buns have doubled in size, using the remaining milk to brush the tops of them before baking them for 20 - 25 minutes. You can test when they're down by tapping the bottom and listening for the hollow noise.
Use a pastry brush to spread the sugar glaze over baked buns, sprinkling with the caraway seeds and crushed sugar cubes so they stick to the still wet glaze. Enjoy!
Blood Orange Marmalade | A Bear Called Paddington
'I daresay you'll be wanting some marmalade.'
A Bear Called Paddington
Michael Bond
My life has been taken over by marmalade while in lockdown. I've made so many batches of it now I've taken to sending it off to friends across the country, with my fingers crossed that there are no leakages within the journey (only one so far and I kind of blame the post for that!).
Despite never really taking to marmalade in my youth - who would want orange flavoured sugar when you could have jam? - it's begun to take up a spot in my cupboard in recent months. I still stay away from the traditional orange marmalade, but the flavours with a more sour or tart note have definitely grabbed my focus. I've sampled so far blood orange, pink grapefruit, kumquat, tangelo and a few other varieties - but the blood orange has almost definitely solidified itself as a favourite.

Of course, there's no other book that this meal could be from other then Paddington. I don't think much of an explanation is required there.
Blood Orange Marmalade
Makes approx. 1 ltr of marmalade
Ingredients
5 - 6 blood oranges
1 k of white sugar
2 lemons
Water
Half and juice all the oranges into a bowl. Use a spoon to scrape the flesh, pips and white membrane of the oranges out as well, keeping them to the side.
Using a sharp knife, slice the peels of the oranges thinly - you want the strips to not be more than a few inches long and quite thin. Place into the bowl with the juice. You want around 1 litre of juice now, so if it's too low add some water to compensate.
Gather all the insides of the oranges together (seeds, membrane, flesh etc) and using a cheesecloth (or anything else that will work), make them into a bundle with the cloth. Place the cloth bundle into the bowl of juice and refrigerate the entire lot overnight.
The next morning place a plate into the freezer so it's ready for when you need to test the marmalade.
Transfer the juice, cut peel and bundle of the orange insides into a large pot and bring to a slow simmer. Leave on the stove for around one hour - or until the peel has softened. Leave to cool.
Remove the pieces of peel and place to the side for later. Strain the juice, getting rid of any flesh parts of the orange that may have snuck in, making sure that you liberally squeeze the cloth bundle, getting as much juice from it as possible. The juice likely will reduce when you cooked it - so measure it and add water in if needed - you should have 750ml of it.
Place the strained juice back into the saucepan onto a medium heat, adding in the juice of both lemons. Add in the sugar and stir until it dissolves. Add the peel back in and bring to the boil.
Leave to boil for around 10 minutes - to test if the marmalade is ready, take the plate from the freezer and drop a spoonful of the marmalade onto and wait around 20 seconds. Use the spoon to push the marmalade across the plate - if it wrinkles when pushing, it's ready.
Leave the marmalade to cool before distributing it evenly into clean, prepared jars. Enjoy!
Lemon Cardamom Buns | Normal People
Beside her on the desk is her breakfast, which she just purchased from the supermarket across the street: one black coffee with brown sugar, one lemon pastry roll.Normal PeopleSally Rooney
Beside her on the desk is her breakfast, which she just purchased from the supermarket across the street: one black coffee with brown sugar, one lemon pastry roll.
Normal People
Sally Rooney
I'm sure many people were inspired to pick up the story of Normal People recently, with the release of the brilliant television adaptation. I was one of those people, I had read Normal People probably a year ago or so - but realised I remembered little of the plot when the ads for the show started to emerge. I think it's a bit of second read phenomenon but I utterly devoured the story this second go around. I couldn't tell you of any significant parts the first time I read it, with most of the plot seemingly a blur in my head. The second time though, I went back to read over paragraphs again and again, inhaling the words at a frightening speed - and connecting far more than I would have thought.
Moral of the story here is basically - don't give up on a book the first try, sometimes the second read if what you need.

Normal People is lacking a little in the delightful mentions of food that other authors tend to do so well with, but the lemon roll that Marianne snacks on carefully in Sweden was the only dish that really caught my attention. Possibly because I'm eternally jealous I haven't yet been to Sweden - or really anywhere in Europe. Either way, this recipe below is a bit of a twist on the classic Swedish cinnamon bun, introducing a good amount of lemon into the glaze that really left the final product as a delicious, sticky, sweet and slightly tarty treat.
Lemon Cardamom Buns
Makes approx. 7 - 8
Ingredients
Dough
385g plain flour
2 1/2 tsp dried instant yeast
60g caster sugar
240ml milk, lightly warmed
60g butter, melted at room temp
1 tsp ground cardamom, or finely ground if using pods
1/4 tsp sea salt
Filling
40g brown sugar
60g butter, softened
1tsp ground cardamom
1 tbsp ground cinnamon
1 tsp ground nutmeg
Glaze
60g caster sugar
80ml water
Zest and juice of 2 lemons
To make the dough place the yeast, flour, cardamom, sugar and salt into a bowl - mixing well. Add in the melted butter and milk at intervals, mixing the dough together until all liquids have been added and the dough is coming away from the sides of the bowl. You may need to use your hands for this to properly combine everything.
Turn the dough out onto a lightly floured surface and knead for about 8 minutes, until the dough softens and becomes quite smooth and stretchy. Lightly oil a bowl and place the dough inside, turning to cover it with oil - this will help stop the dough from drying out. Cover with some cling wrap and leave in a warm spot for around an hour or until the dough has doubled in size.
During this time is a good opportunity to prep the filling. Combine the butter, brown sugar, nutmeg, cinnamon and cardamom together, mixing until it is all combined into a paste and is easy to spread.
Preheat oven to 180C and prepare an oven tray with a layer of baking paper (you may need two trays depending how big they are).
Once the dough has doubled in size, tip it out onto a lightly floured surface and roll it into a square that is around 25cm by 25cm. Gently spread your filling onto it, so it is evenly distributed.
Fold your square of dough into thirds - like a business letter. Using a sharp knife, cut strips length ways down (ensuring you're cutting to get the longest possible strips of dough), each strip should be around 5cms wide.
I recommend looking up some Youtube tutorials for shaping these as it helped me a lot initially. One strip of dough at a time, you want to hold each end and twist gently while slowly stretching it out a little. One the strip of dough has spiralled, gently wrap it around your hand twice, tucking the end of the dough into the middle of the spiral as to seal it off.
Place on the oven tray, leaving as much distance between them as possible and cover with a clean tea towel. Leave for an additional 45 minutes to allow the shaped buns to rise some more.
While the second rise is happening, it's a good time to prepare the glaze. Combine the sugar, water, lemon juice and lemon zest in a small saucepan and cook on a medium heat until the sugar has dissolved and the mixture is lightly bubbling. If you want it quite sticky and thick, you can leave it on the stove for longer to cook - otherwise remove it and leave it to the side to cool.
Once the formed buns have risen, bake them in the preheated oven for around 15 - 17 minutes, keep an eye on them as it's easy for them to start browning very quickly.
You can leave the buns to cool - but it's more fun to glaze when hot so you get the lovely sizzle. Use a pastry brush to spread your prepared lemon glaze all over the buns. Enjoy!
Mushrooms on Toast | Wild Pork and Watercress
I liked doing things for Aunty Bella, she was a real good sort, and made the most beautiful brawn you've ever eaten. And she could turn a bucket of ordinary old mushrooms into the most delicious bacon-y creamy toast-soaking stuff you could image. She had a bit of magic, Aunty Bella. She was my best friend as well.Wild Pork and Watercress - Barry Crump
I liked doing things for Aunty Bella, she was a real good sort, and made the most beautiful brawn you've ever eaten. And she could turn a bucket of ordinary old mushrooms into the most delicious bacon-y creamy toast-soaking stuff you could image. She had a bit of magic, Aunty Bella. She was my best friend as well.
Wild Pork and Watercress
Barry Crump
I went through a phase I'm sure many did when they were young, where mushrooms were possibly the vilest food imaginable. That was, until, I read and subsequently became obsessed with The Hobbit and Lord of the Rings. This new knowledge that my absolute favourite creatures (I'm quite short, I think I likely thought I was a hobbit at this age) were obsessed with mushrooms and craved them incessantly? Well then, guess what my new favourite food became?
The absolutely gorgeous book, Wild Pork and Watercress, from which the above quote has been taken from, inspired this late lunch this past Sunday. The book itself is a beautiful story set deep within the bush of New Zealand, any fans of Taika Waititi's work have likely seen Hunt for the Wilderpeople, which is based upon this book. The thought of going mushroom picking and then indulging lavishly in your findings feels like a distant dream when living in a city.
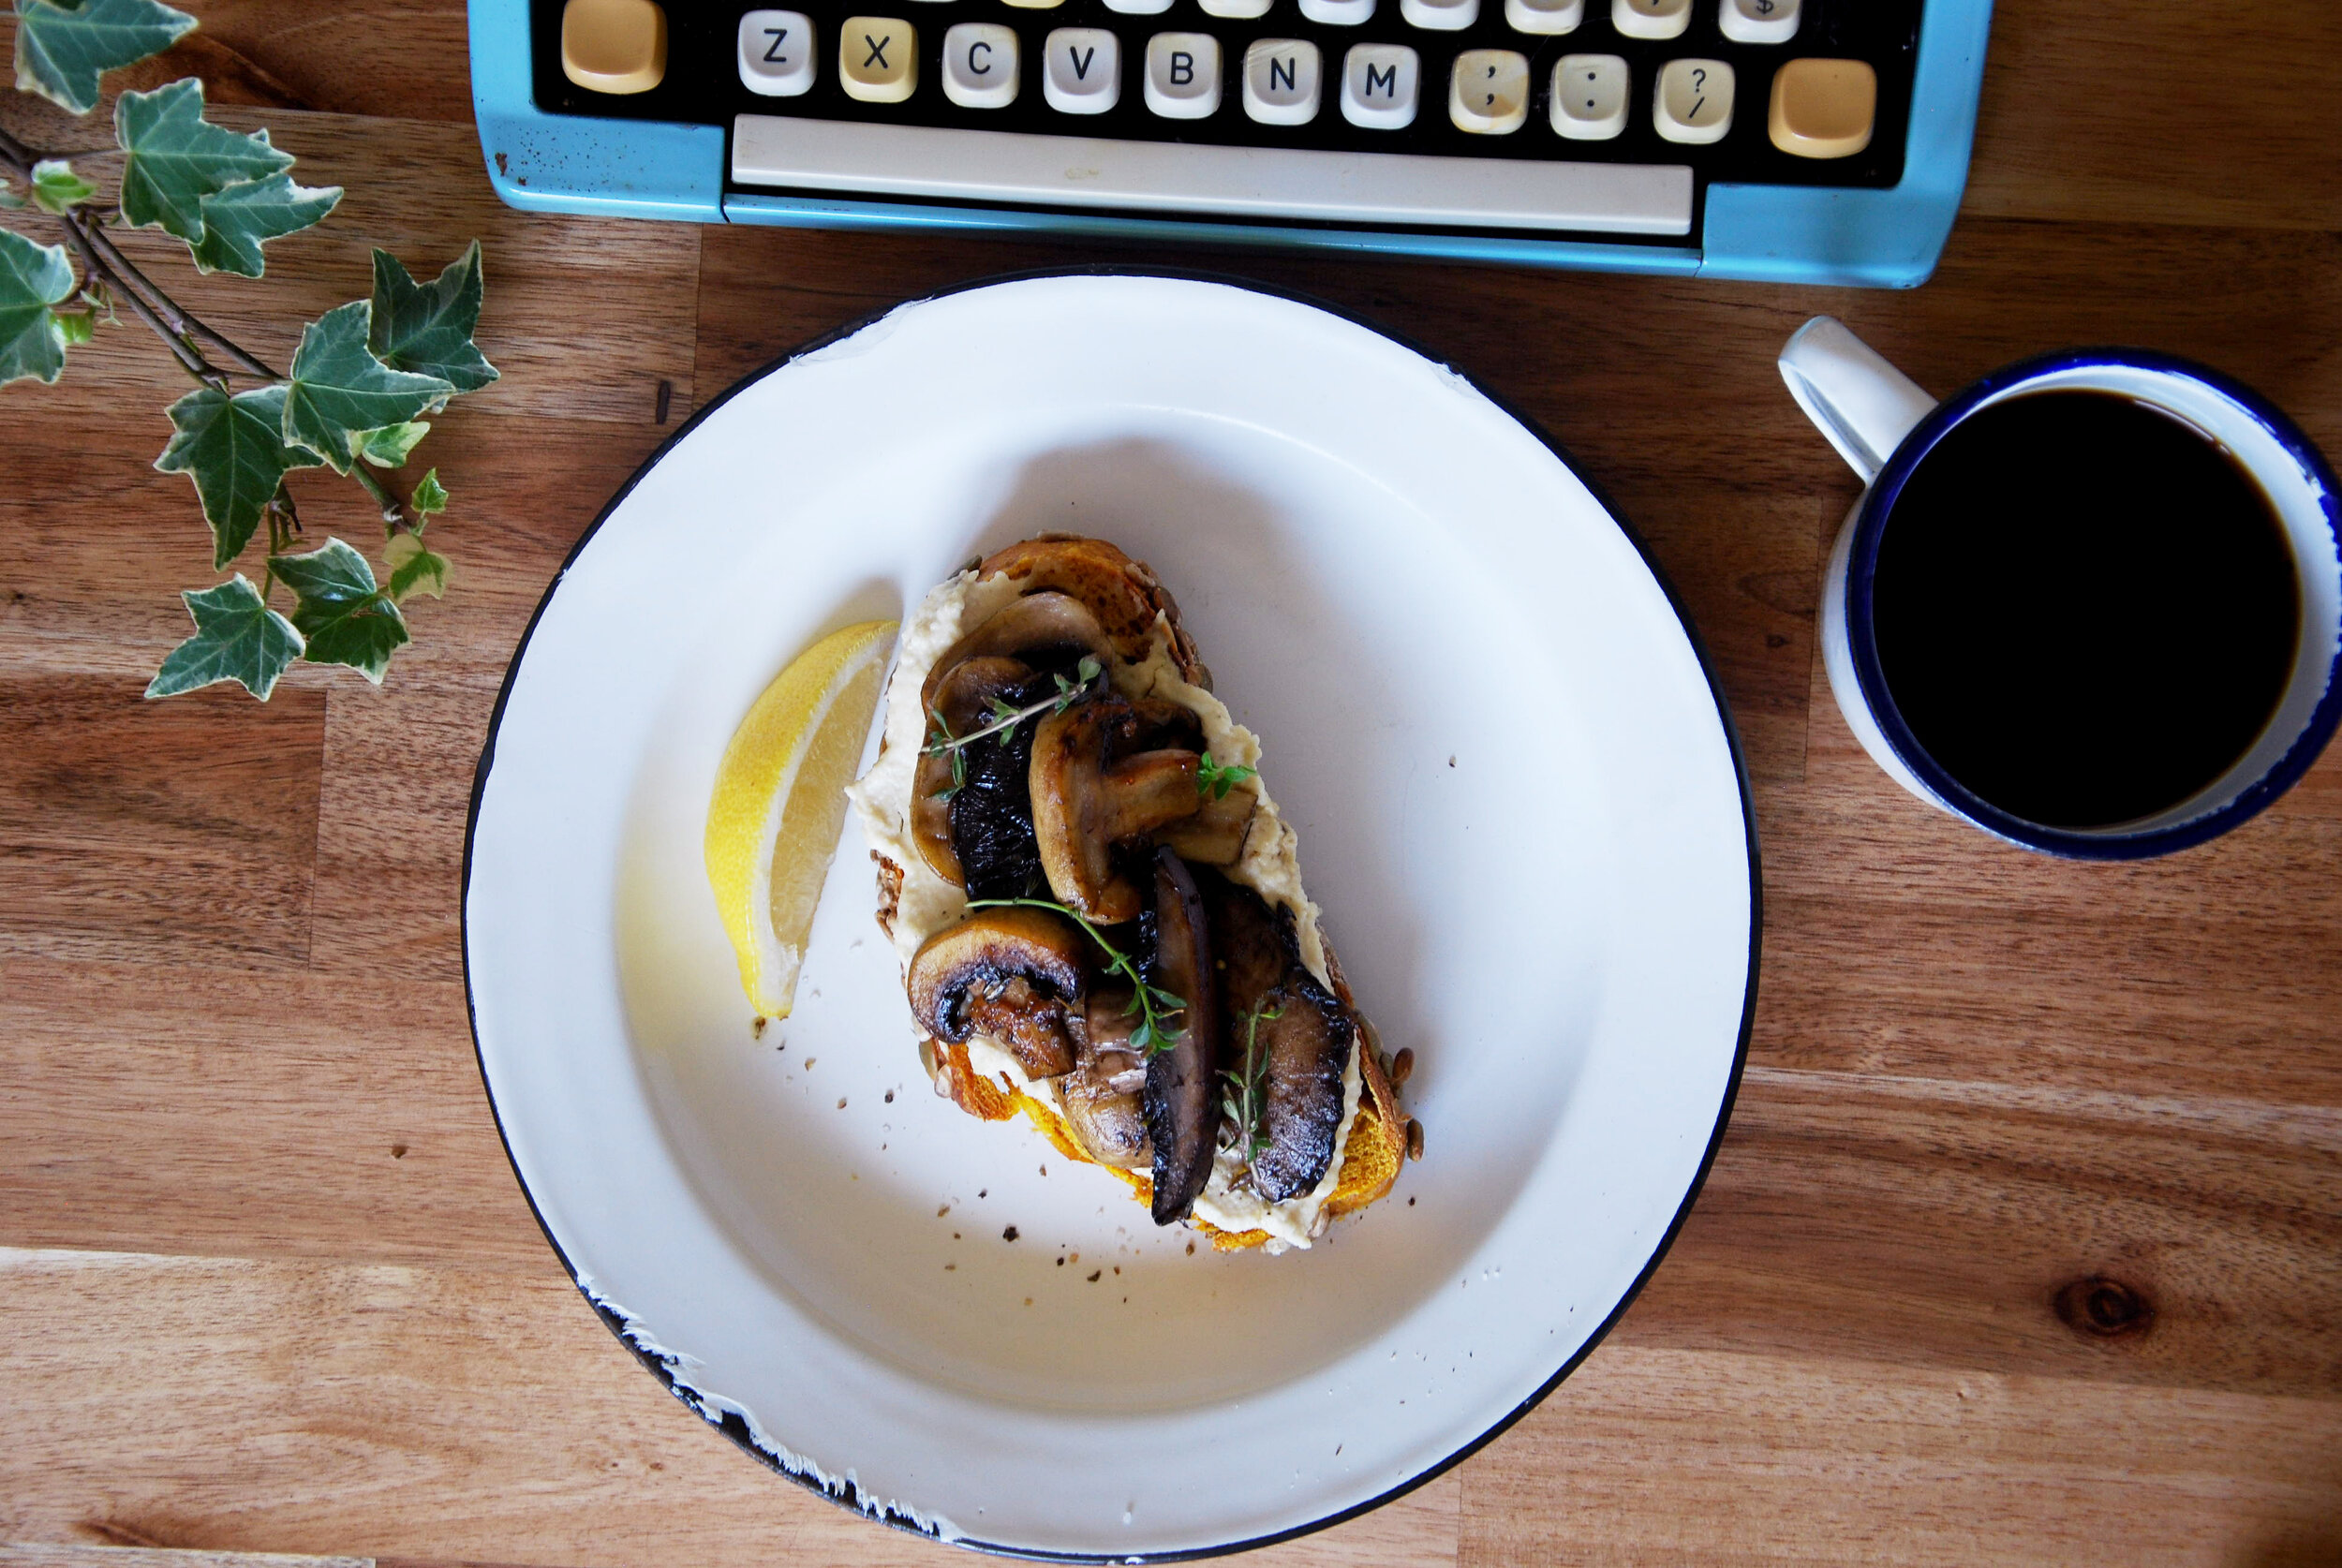
I have faint, faint memories of being young and being dropped at a family friend's house, spending the day with the other children running off into the neighbouring farms with a bucket, hunting down the wild mushrooms that we could find. Returning, only to have the mushrooms cooked and mushed down into almost pate that we spent the afternoon devouring.The recipe below isn't quite matching up to that memory exactly, but instead something that has become a sort of staple over the years for my own dinner. Affectionately called, stuff on toast. As it is hard to find a decent vegan ricotta or cheesy like spread without spending a small fortune, the below cashew cream spread recipe has become my go to, the perfect tart-y and creamy differentiator between the crisp toast and buttery mushrooms.
If you are a meat eater, I would highly recommend cooking up some bacon to go with this and then cooking your mushrooms in the leftover bacon fat. I believe the results would perfectly summarise the delight of Aunty Bella's mushroom dish.
Mushrooms on Toast(with cashew cream)
Makes approx. enough for two servings
Ingredients
400g mushrooms, any kind of mushrooms will be delicious with this, sliced
2 tbsp butter
1 1/2 lemon, juiced
150g raw cashews
1 tbsp apple cider vinegar
1/2 cup cold water
2 slices thick sourdough toast
2 - 3 sprigs fresh thyme
Sea Salt
Fresh Pepper
Soak the raw cashews in water for at least two hours - you can hurry this along by breaking them up into smaller pieces.
Drain and rinse the cashews before placing them into a blender or food processor, along with the cold water, juice of one lemon, apple cider vinegar and a good few twists of salt and pepper. Blend until smooth - it will likely have a few cashew chunks throughout, if this doesn't bother you feel free to leave as is. Place cashew cream to the side.
Heat a frying pan on medium heat, adding in the butter. Let the butter melt and start frothing slightly before adding in the sliced mushrooms, thyme and a few twists of salt and pepper. Cook for around ten minutes or so, moving the mushrooms around the pan to prevent them sticking, adding in a few squeezes of lemon juice. They should soak up the butter and appear a lovely caramel-y brown colour. When cooked, remove from the stove.
Get your toast ready and spread a good, thick layer of the prepared cashew cream on before placing the mushrooms on top. Season with a little extra salt and pepper or lemon, if you like. Enjoy!
Cheesymite Scrolls | Possum Magic
'It was there, in the far north of Australia,that they found a Vegemite sandwich.Grandma Poss crossed her claws and crossed her feet.Hush breathed deeply and began to eat."A tail! A tail!" shouted both possums at once.For there it was. A brand new, visible tail!'- Possum Magic, Mem Fox
It was there, in the far north of Australia,
that they found a Vegemite sandwich.
Grandma Poss crossed her claws and crossed her feet.
Hush breathed deeply and began to eat.
’A tail! A tail!’ shouted both possums at once.
For there it was. A brand new, visible tail!
Possum Magic
Mem Fox
Daylight savings has arrived in Melbourne, and the longer days are leaving me wanting to bake doughs that require hours to rise. To leave the house smelling like fresh baked bread every morning and to enjoy thick slices layered with butter and jams. Which, luckily, is basically what I can do every weekend. A friend dropped around some Seville orange marmalade she whipped up also recently, I’m sure that will go down a treat with the next bread batch (or crumpets, if the mood strikes).
My favourite bookstore in all of the city is one called Readings. It’s multiple shelves of books that line the walls give off an aura of comfort, along with the fact that it is open most days till 11pm. There’s nothing like a few pints, followed by an excessive book shopping spree. On a recent browse throughout the store, I wandered into their sister store next door - Readings Kids. While my attention was mostly focused upon the elaborate and beautiful editions of some classic children’s novels I’d read at a young age, I found myself flipping through a copy of Possum Magic.

I doubt there is a child in Australia that has not had Possum Magic read to them at one stage in their life. Mine was from my librarian within my primary school - a woman that I can still remember with such strong, fond feelings, despite not being able to recall even the slightest memory of her face or name. The book is a beautiful adventure of Hush and Grandma Poss, exploring so many Australian concepts and delights.
This recipe was definitely inspired by the reread I hurriedly undertook within the store, the joyful memories of my first interaction coming back to me as I flipped through the pages. I baked a full batch of cheesymite scrolls for a charity bake sale that coming weekend - followed by another batch to carry along to a middle eastern inspired breakfast thrown by a friend. All disappeared quite briefly.
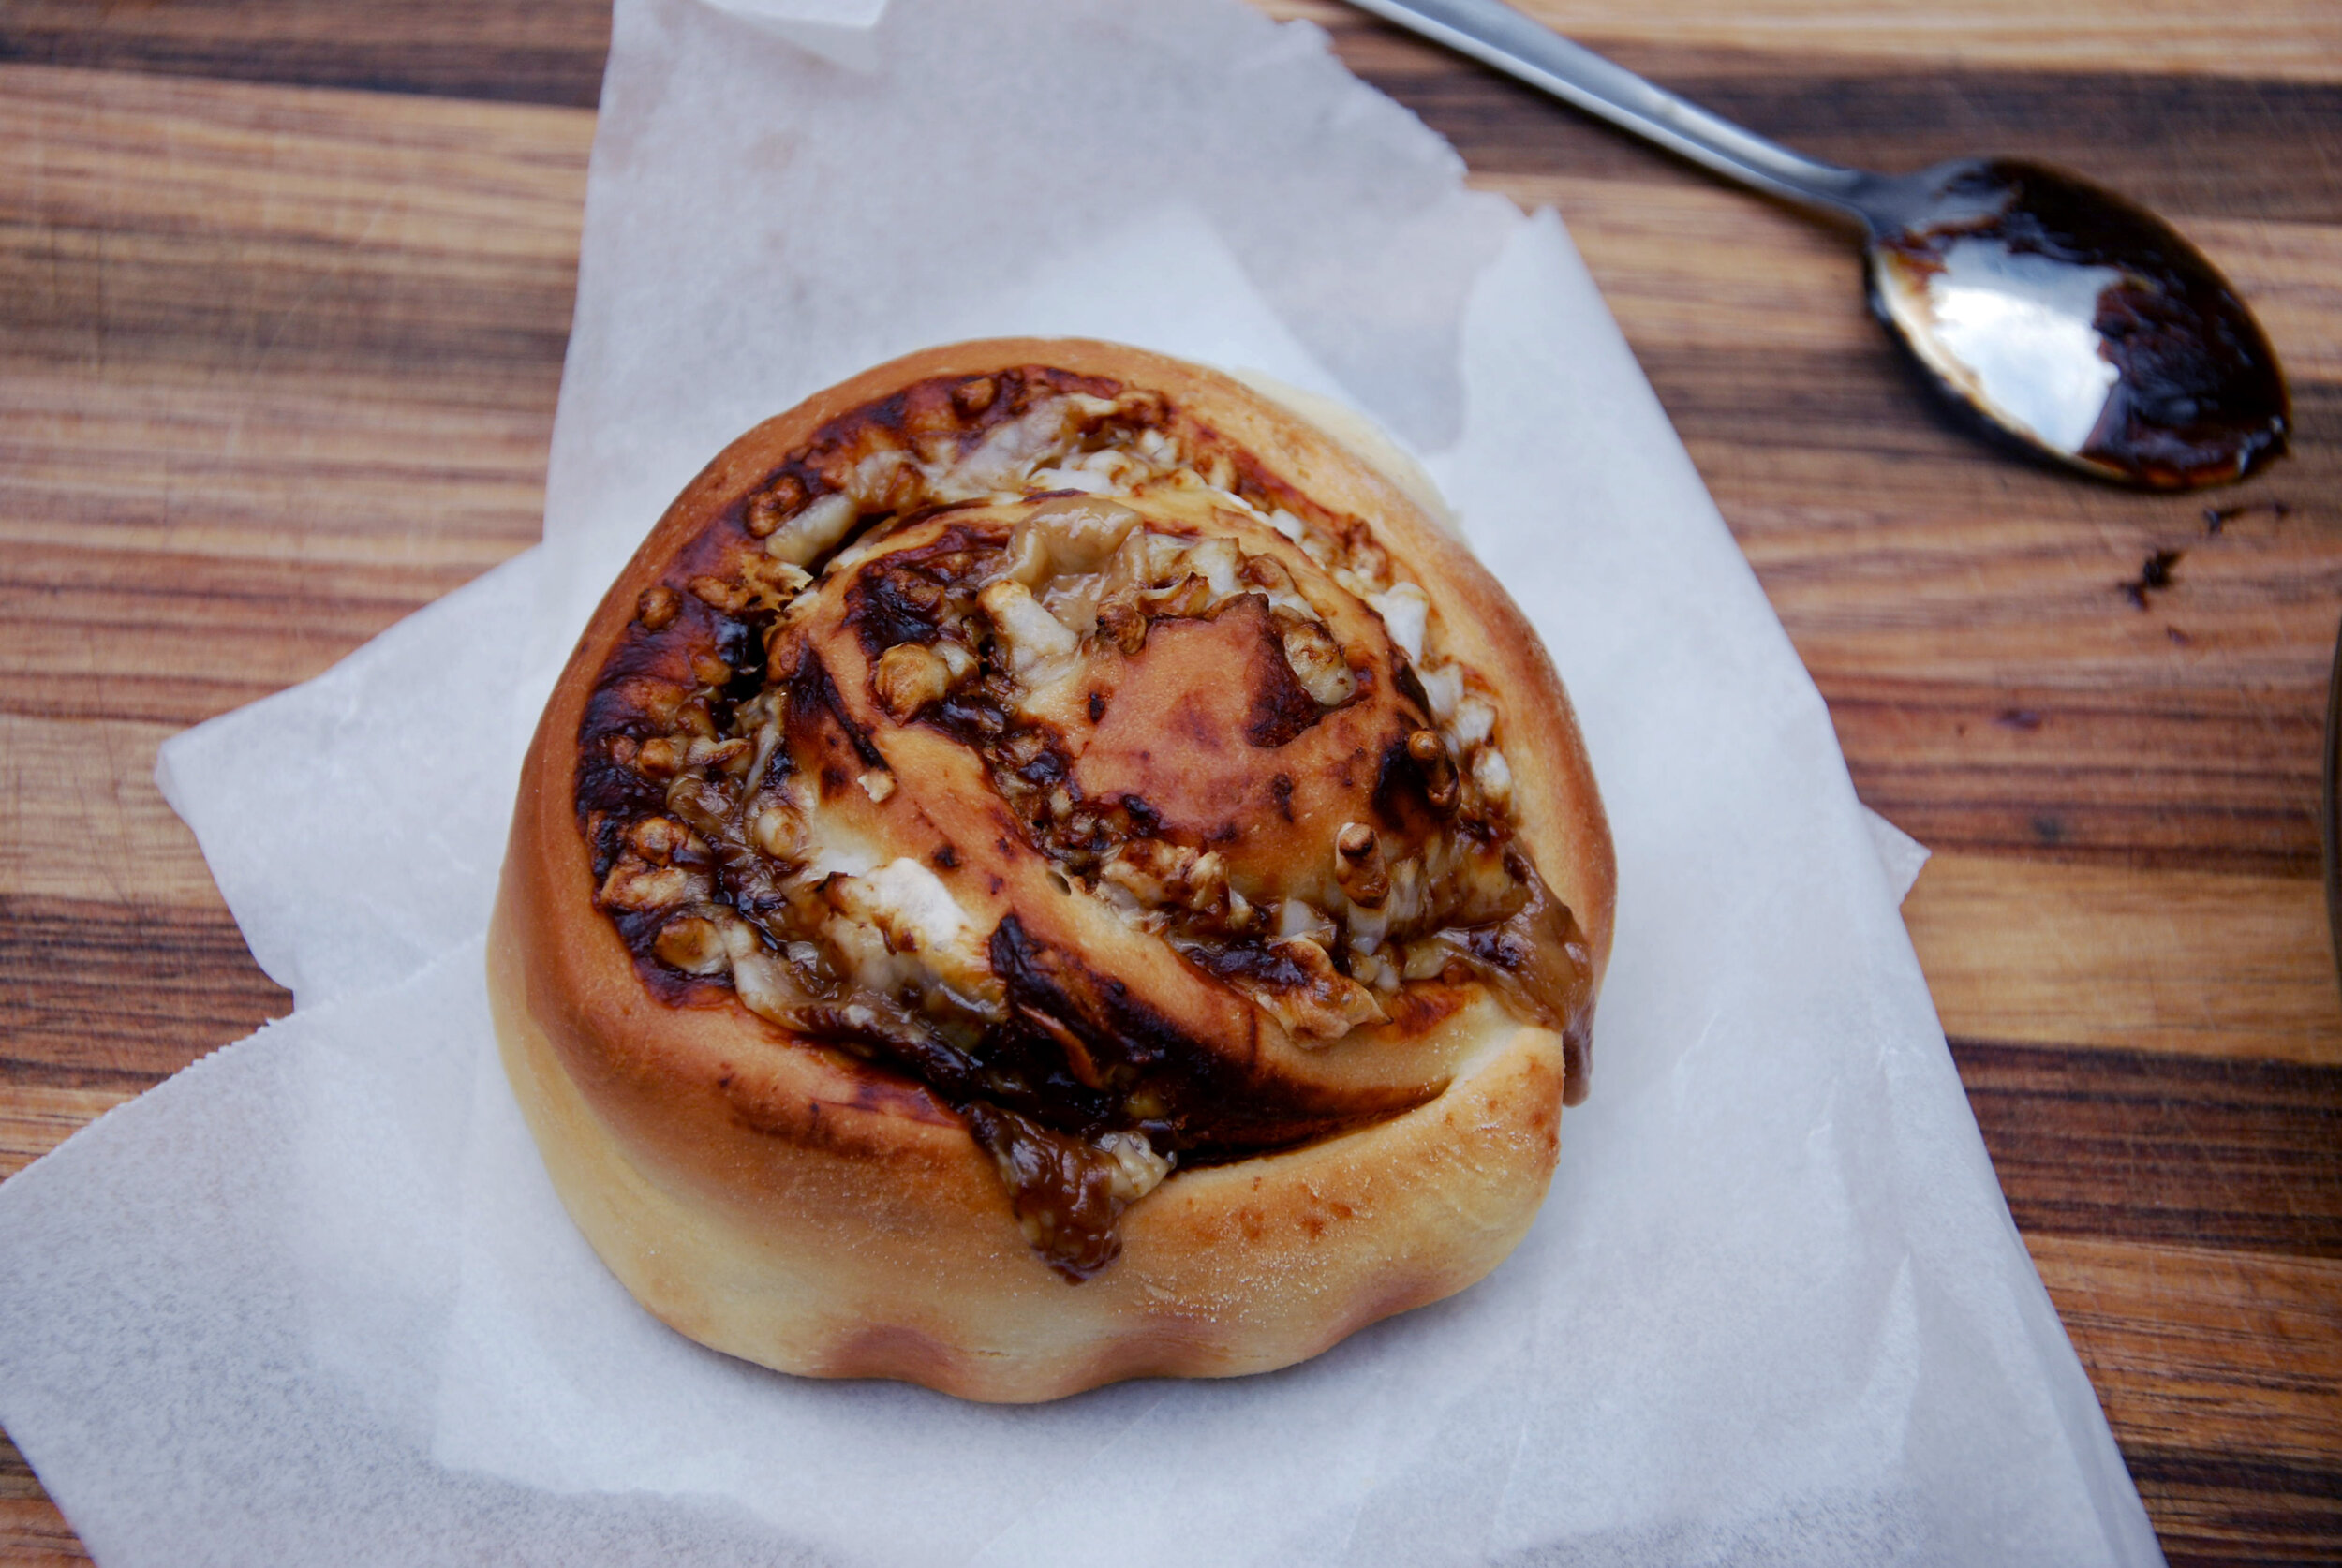
This recipe for Cheesymite scrolls is a classic Australian one, that every Australian likely has had once. This recipe is from Smith & Deli's cookbook - and produces the most delicious scrolls.
*Note: I used a stand mixer with a dough hook for this - but totally fine to do it by hand. Just knead it for an extra five minutes or so.
Cheesymite Scrolls
Makes approx 12 scrolls
Ingredients
2 tsp instant yeast
2 tbsp caster sugar
375ml cups lukewarm water
525g plain flour + 2 tbsp for dusting later
2 tsp salt
90ml olive oil
4 tbsp Vegemite, mixed with 2 tbsp water
250g grated cheese
30g butter, melted
Combine the warm water, yeast and caster sugar together in a bowl. Leave for a few minutes or until frothy.
Combine the flour and salt together in the bowl of your mixer* (see note), using the dough hook attachment.
Add the oil to the flour mixture, and add in your forty yeast while the mixer is slowly running. The dough should come together and be quite soft, if it is too sticky add another few tablespoons of flour. Leave in the mixer to knead for another five minutes or so.
Cover the dough with a clean cloth, and leave in a warm place to rise until it has doubled in size, or at least thirty minutes.
Preheat your oven to 190C.
Dust a bench or board with the remaining flour, and being your raised dough out onto it. Roll the dough into a rough rectangle, so that the dough is no more than a few centimetres thick.
Using a silicone spatula if you have one, or the back of a spoon, spread the Vegemite thickly over the rolled out dough, getting it right into each corner. Follow that up by covering the Vegemite with a good layer of cheese - the cheesier the better, of course.
Starting at one end, roll the dough up tightly and cut slices off to form the scrolls. Each slice should be approximately 8cm thick.
Place the scrolls into a baking pan that is either lined with baking paper or well greased, and leave to sit covered for another thirty minutes or so or until the scrolls have doubled in size.
Brush the tops of the risen scrolls with the melted butter and pop into the oven for around twenty minutes.
Enjoy! Best eaten hot and gooey from the oven with a cup of coffee.
Dutch Christmas Bread | The Goldfinch
“Lifting the tops of the trays with a flourish. ‘Special Dutch Christmas bread,’ he said, pointing it out ironically. ‘Just for today.’ I’d ordered the ‘Festive Champagne Breakfast’ which included a split of champagne, truffled eggs and caviar, a fruit salad, a plate of smoked salmon, a slab of pate, and half a dozen dishes of sauce, cornichons, capers, condiments, and pickled onions."
Lifting the tops of the trays with a flourish. ‘Special Dutch Christmas bread,’ he said, pointing it out ironically. ‘Just for today.’ I’d ordered the ‘Festive Champagne Breakfast’ which included a split of champagne, truffled eggs and caviar, a fruit salad, a plate of smoked salmon, a slab of pate, and half a dozen dishes of sauce, cornichons, capers, condiments, and pickled onions.
The Goldfinch
Donna Tartt
The Goldfinch is really an incredible book - it draws you into the narrative of the main character in a way that shouldn’t be so fascinating, but is. The author, Donna Tartt, entices you deeply into the life of the titular character Theo and his struggles with the direction his life takes.
Another great thing about The Goldfinch is the absolute smorgasbord of food that Theo partakes in throughout the pages of the novel. Form western omelettes and home fries to caviar, fruit salad and smoked salmon pate. With so many choices it became increasingly difficult to narrow down what I would make from it (though I am sure that more from it’s pages will appear on this blog at some point in time). I ended up deciding on Dutch Christmas bread, a component of the delightfully indulgent breakfast that Theo orders on what he believed may be his last free day.
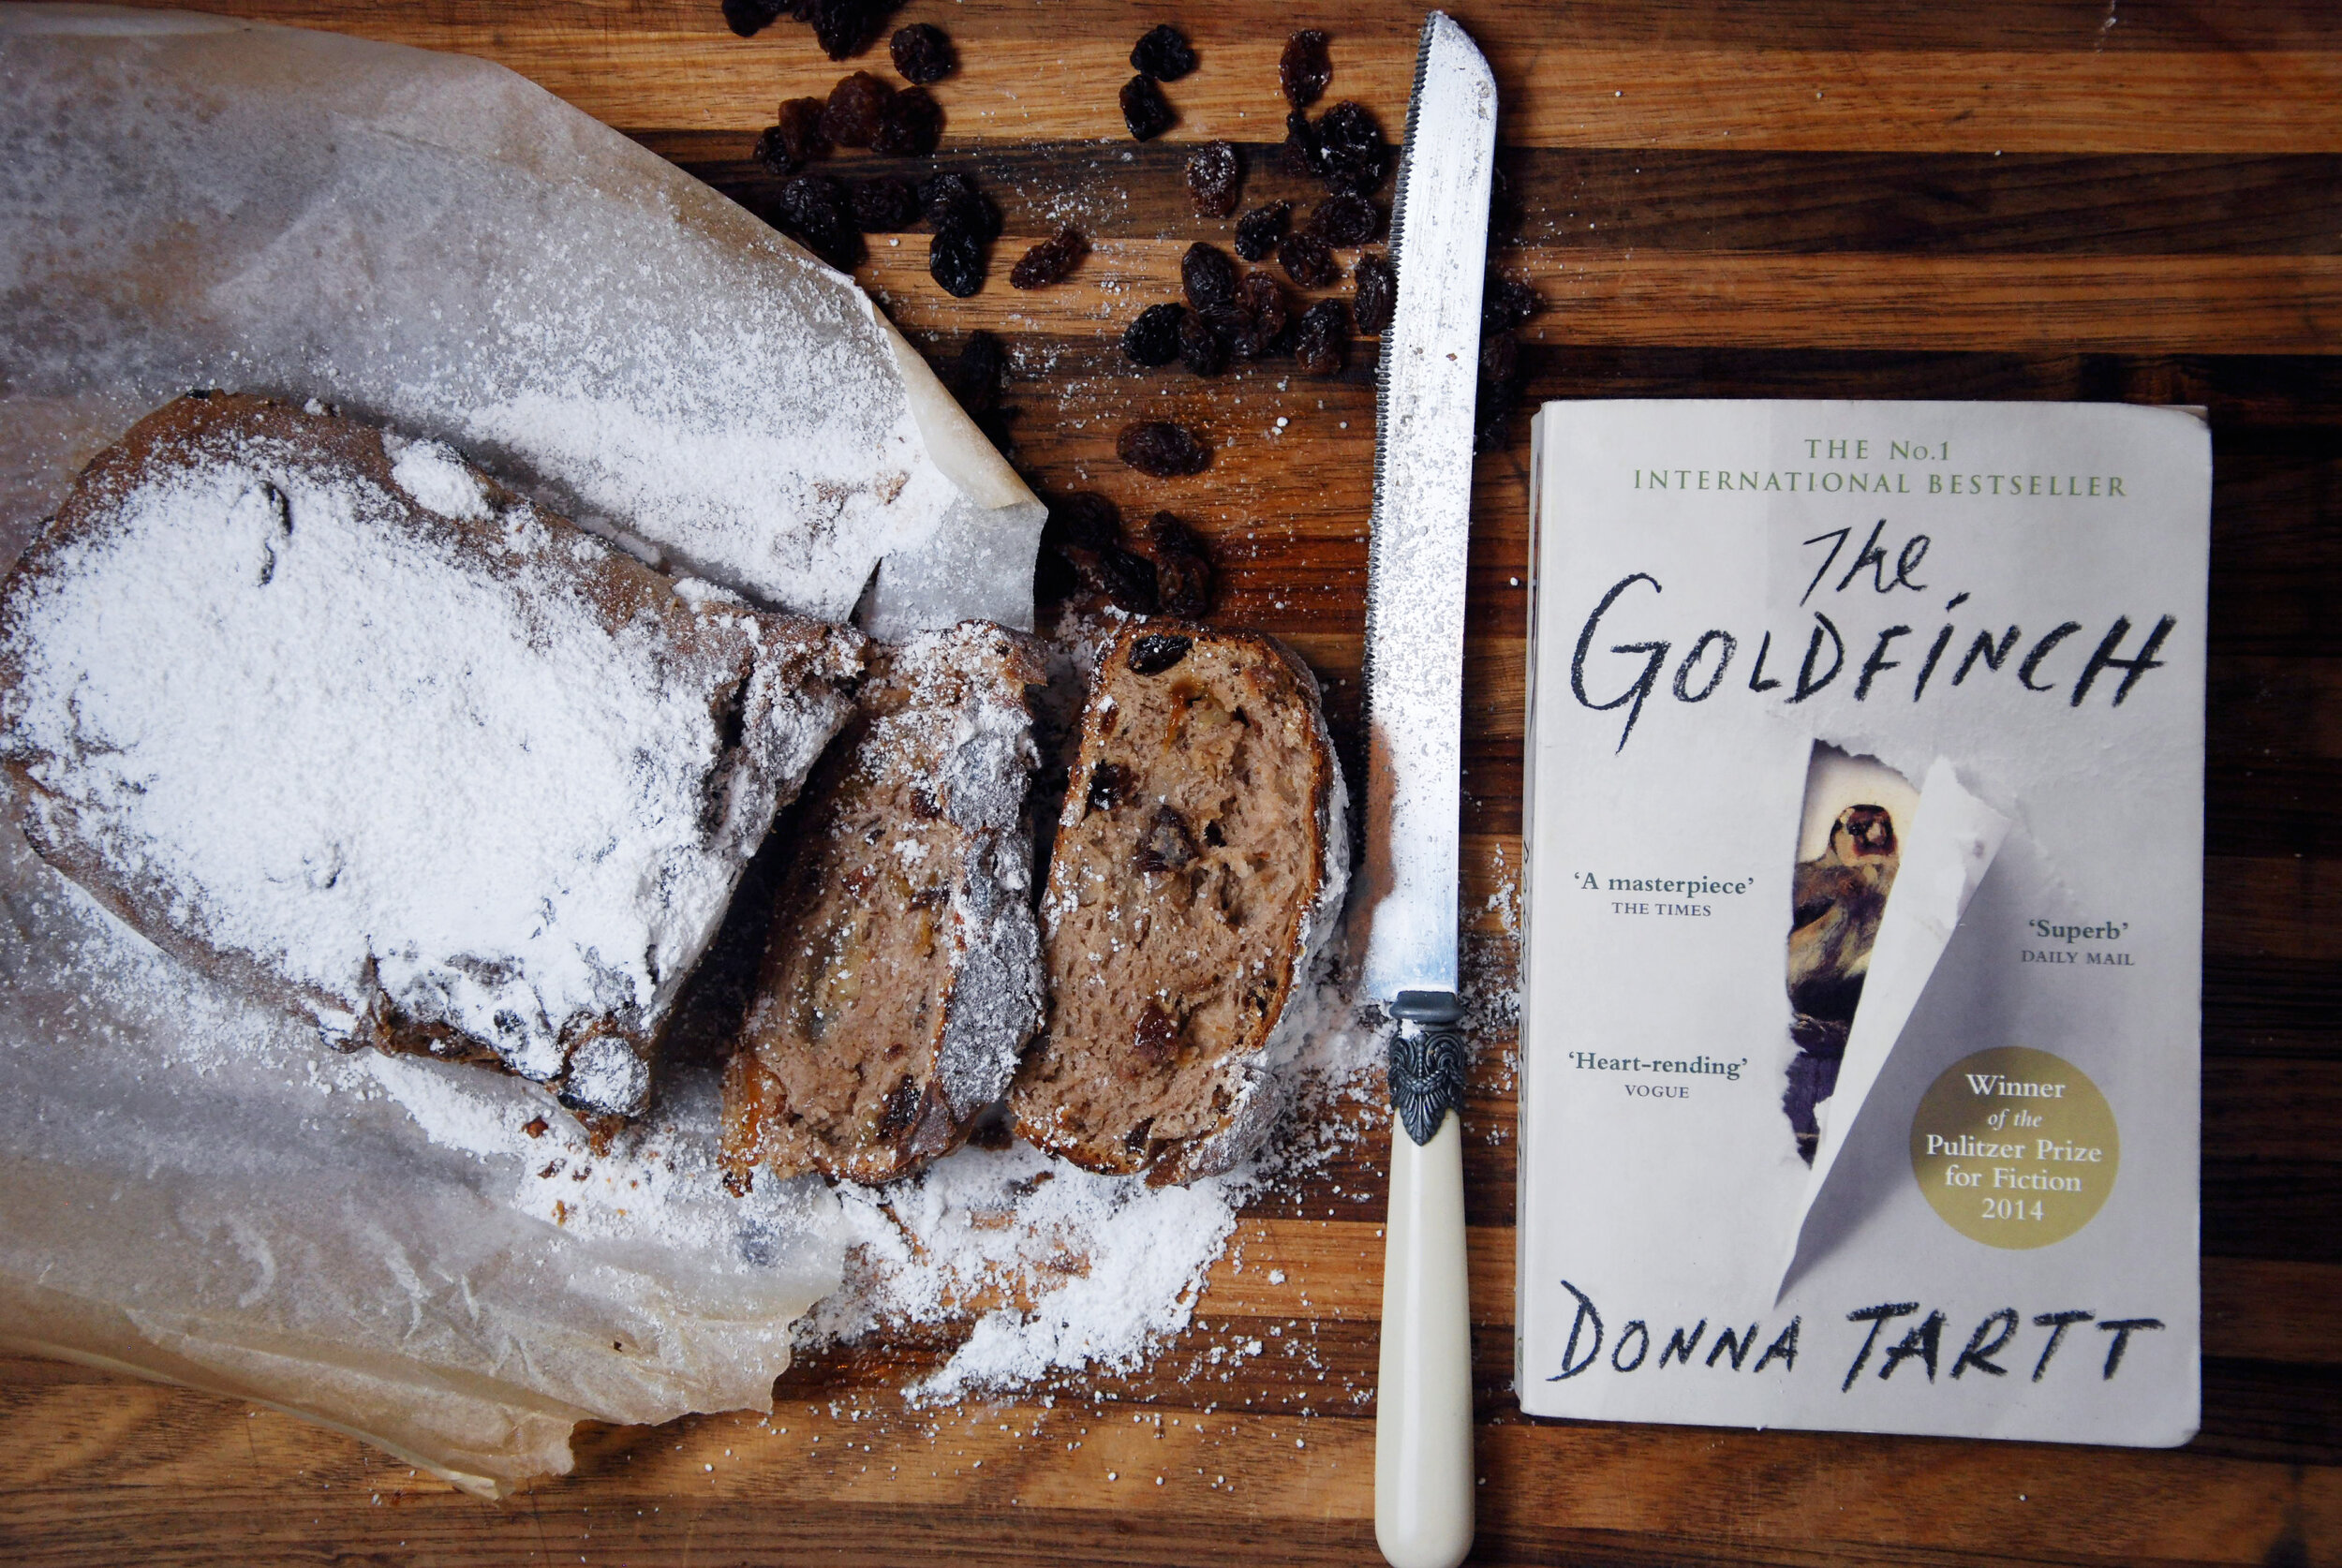
Also, because I wanted to know what Dutch Christmas bread was. A little bit of googling later and I came across the delicious looking Kerststol - a Dutch version of the more well known German stollen. A yeast-based bread filled with rum soaked fruits and nuts with pockets of marzipan or almond paste hidden within. I combined a few recipes online to come up with a vegan version that worked well - my first batch turned into a rock hard mess, but the second came out light, fluffy and deliciously warm.
Dutch Christmas Bread
Ingredients
Dough
1 1/2 cups of plain flour + 1 cup (you may need a little extra if the dough is too sticky etc)
1/2 cup milk
3 tbsp melted coconut oil
2 tsp active yeast
3 1/2 tbsp white sugar
2 tbsp water - warm
1/4 tsp salt
1/2 tsp cinnamon
1/4 tsp ground ginger
1/4 tsp ground nutmeg
1/4 tsp ground cardamon
1/4 tsp ground gloves
1 tsp vanilla
Icing sugar - for decorating
Fruit Filling
1/4 cup raisins
1/4 cup walnuts
1/4 cup dried apricots
3 tbsp dark rum
Zest of one orange
Almond Paste
1 cup almond meal
1 cup icing sugar
1 tsp maple syrup
3 tbsp cold water
1 tsp almond extract
Rough chop the dried apricots, walnuts and sultanas, combine with the zest and cover it all with the dark rum. Put it all in a sealable container and give it a good shake to make sure they’re all covered - these need to sit in the fridge for at least one night.
The almond paste should also, ideally, be made the day before. Combine all the ingredients in a food processor and pulse until they all come together as a soft ball. You may need to add a little more powdered sugar if necessary. Wrap it up tightly in cling wrap and refrigerate.
Combine the active yeast, warm water and 1/2 tbsp of sugar in a mixing bowl. Leave for about ten minutes - until it goes quite frothy.
Add in 3/4 cup of plain flour to the yeast mixture, along with the remaining sugar, milk and oil.
Separately mix together 3/4 cup plain flour, all the spices, vanilla, salt and the soaked nuts and dried fruits (make sure you pat the excess liquid off these, otherwise they can make the dough too soggy).
Combine both mixes together and knead for 5 - 8 minutes, adding in additional flour if the dough feels too sticky. It shouldn’t be too dry - and should be able to be rolled into a ball easily.
Place the dough into a lightly oiled bowl and cover with a clean cloth - leave in a warm place to rise for around two hours.
Once the dough has doubled in size, place it back onto a lightly floured surface and give it a quick knead before pressing down into a rough rectangular shape - around 5cms thick.
Place chunks of the refrigerated almond paste over the dough - depending how much you want in there. Roll up the dough tightly from the side and press the seams together.
Place into an oiled bread tin and cover again, leaving to rise for another two hours.
Preheat oven to 170C.
Once the dough has doubled in size, bake it for around 30-40 minutes - checking to see if it’s done by how hollow the top sounds when tapping it.
Leave to cool for about 10 minutes, and decorated with a liberal sprinkle of icing sugar on top. Enjoy!